Saka Light Cavalry

Saka Light Cavalry

Thursday, 11 March 2021

Eddie 'The Trooper' Twin Commission

 I have had little exposure to 3D printed figures up to this point so was not quite sure what I was agreeing to, possibly a good job. These are unfortunately one piece prints so was quite cumbersome and created a few challenges when it came to painting some areas part blocked by arm's swords or staffs etc etc etc.

One of the two at least was simply pained more or less as the singles sleeve, it's also a good representation of said artwork. Of course the detail not shown on the sleeve such as the back etc had to be added by the sculptor and I think they did a really good job of that.

The photo above gives you an idea just how big the figures are. Lots of detail is hidden in the clear resin, I have Vallejo's surface primer German Panzer Grey which is perfect for covering this semi flexible resin.
The Union flag is a bit bastardised, the actual artwork gets it really wrong so I was torn between doing it right and following the artwork. Made more difficult as one of them was going to a ex soldier!
The base is a resin plinth from Model Display Products and I have used cork bark for the stones and a liberal sprinkling of static grass and tufts, so may tufts.

I made good use of my new paint sets from Andrea for the red and blue of this one. The other was mostly Vallejo. Both were for the most part painted at the same time, all excepting the coat and trousers.


The second Eddie was painted in the Royal Engineers colours, well I hope so anyway. Both sword blades were a real pain, breaking off and I reattached them after finishing them. 

The gore on the blade was already there, I simply painted and varnished for the fresh look  ;-)

I was given the test piece for this figure but it lacks the bottom of the staff and I really don't plan on painting him any time soon. That's not to say I did not enjoy painting them but another would be pushing uphill for sure. 

The inspiration and reference material. Hopefully Iron Maiden won't be too upset with the finished product lol. It may not be a surprise that I have moved down a few scales to add more to my own Prussian Napoleonic army.


Sunday, 7 March 2021

Fallschrimjager Bust


This Fallschrimjager bust is from Mitches Military Models and is a new release. He has not been added to the website as yet so if interested you may have to contact him via the contact me button. It's a one piece casting which makes it a lot easier to work with than many a bust.


I also added a decal to the helmet that is designed with Action Men in mind. This being a 1/10 bust it's the same scale so perfect. The distinctive Splinter camouflage smock was a challenge but helped along by using the Andrea Color set for this camourflarge.


 Still struggling to get leather right, still a long way to go before I am really happy with it. The texture to the helmet makes it look more metal and I used oils to grime it up a little.

Technically by the time this camo was available the crest had stopped being put on the helmets. I claim artists licence and run for the hills. I have a second one of these busts so may paint it up in the earlier uniform variant. 


Thursday, 18 February 2021

Old Guard At Bay 75mm Figure and 6mm Reinforcements SOLD

 A couple of first's, first 75mm figure and first battalions for my 6mm French Napoleonic's for a couple of years. It was great to get back to painting some of my 6mm Napoleonic's especially as I was working on Old Guard in both scales.

A bit of a difference in size, I have only a few French Guard units in 6mm, I don't even have a large number of castings in hand as Lee took care of most of them for our Waterloo game. I always planned to add them but in no real hurry so will be happy to get through more of the castings I own before buying more.
The 75mm figure (over 90 to top of his bearskin) is from mitchesmilitarymodels.co.uk and they do a fair range of 75mm and 200mm figures and also busts of which I have already bought two. I am very tempted by the Hougoumont dio set which I will probably get at some point.

The kit is made of high quality resin and comes in about 15 parts, I had to paint them as parts rather than post assembly due to overlapping making it too difficult to paint made up. However the parts are really good fits and I have discovered Vallejo plastic putty which really helps seal gaps when putting together.

The figure is based on the final stages of the Battle of Waterloo where the Old Guard was under attack whilst the now defeated French army fell back in disorder with only the Prussians in pursuit. This is the first use of the Andrea white set, the effect I am pleased with for this old standard. The staff is also broken so I tried to represent this with rough painting of the staff.

The backpack was mostly oils to get the mixed finish of cowhide but again the white set was used for the straps. 


The greatcoat and trousers were Andrea blue set but I went a little darker base on the trousers being from different material and dies. The red on the standard is also Andrea (red set) and I really like working with them. The blue on the standard is a mix of Vallejo blues and came out how I wanted it to look.


The base is from modeldisplayproducts.co.uk and was dispatched same day as I placed my order! I do like using this company as having met the owner at a show he comes across as a top guy.

The wheat is from an Italian supplier and has great prices, I literally bough a huge box of materials from them a couple of years ago but this is the first use of these. dioramapresepe.com is the company, has some great how to videos on his website. 


Back to 6mm, these are Baccus as is most of my French army. Whilst we normally do not use skirmisher bases with our rules we found they would be useful when we did the attack on Hougoumont so now when I paint a few units up I will add skirmish bases to the pile. I made the mistake of doing four figures on this one, they should have three. 

Don't really have much to say about them really, dice cells and bases from Warbases the bases being 60x60 but these are very old ones as they are pre laser cut era. Next up in 6mm will probably be some more Prussians. However I have finally got my figure mountain under 3000 figures!! 


Sunday, 14 February 2021

Boche Fini Finished

 My first 1/35 scale diorama came together rather quickly in the end. As always with something like this I learnt quite a bit as I went on.

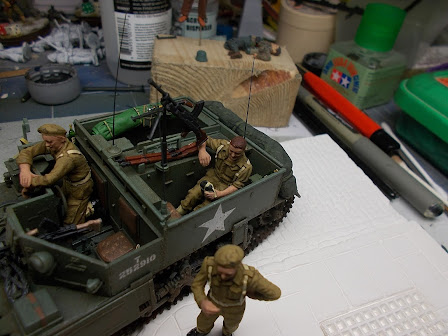
Tamiya Bren Carrier and two figures from the British Patrol set, the Germans are from Master Box German Captives 1944as is the girl, Civilians, Western region WWII era. The old French man comes from Mini Arts French Civilians 30-40s. The dead German is by Stalingrad Miniatures. The base and wall are two kits from Fields of Glory and are plaster of paris with the top of the wall made from resin.


The figures are all plastic except the dead German which is resin. The old man's head is also resin. I have to improve my clean up, I found a few mould lines that should have been taken off appear once I had started to paint them!

The base was a joy to work with, as was the wall, the texture and detail made the basic paint easy and once that and the dry brush work was in place I went to town with pigments and inks. Amazing the detail that can add. Next time I will take even more time over it and make it more suttle.


Tamiya have the deserved reputation of being easy kits to work with with clear instructions. For me the poses of the crew really made this kit work so well. It was the core of my dio idea and helped me build the story tremendously. 

A cheeky pair, I built a gloss to the crews boots, the guys bringing in the prisoners don't, kind of subliminal detail.


I messed around with positioning of the prisoners, Cath pointed out that they were too evenly spaced so I moved them off from each other and was happier with the final positions, Cath can be very direct with her criticism which I am always grateful of.

The German figures for me make this dio, lots of detail and interesting. 

Never fully at ease with putting a dead man on the base I wanted to make it personal, next to his hand is a photo of his wife/girlfriend. Hopefully it will give people pause for thought if they were thinking good he's German. I added the girl mostly as she has a very stern look on her face. The idea that a dead man is just behind her but she is looking at the captured Germans so fiercely, went for lost youth kind of  feel. I also made her colourful to add another dimension.


Overall I am very pleased, I have my next one mapped out in my mind, more rural but won't get started for a month or so as I have other work in the pipeline. This ones for sale for £85 but can only be hand delivered as too delicate to post. I can see this being sold at a show sometime.


Thursday, 21 January 2021

Boche Fini Part 1

 Current project before going back to painting my next bust is a WWII 1/35 scale diorama depicting three German prisoners being escorted through a small French town towards a Bren Carrier. This is the first 1/35 scale vehicle I have ever built and painted so I wanted something fairly simple.

Tamiya have a reputation for producing a good balance between detail and assembly. Indeed I have noticed "they build themselves" more than a few times when reviewing others work. I have to admit it went together rather easily and the detail was good enough for me.

The kit comes with a fair amount of items to fill the carrier and many of these find their way into the model. The towing cable was a piece of string I painted grey black then used a piece of sponge to rub a mix of silver and oily steel onto the more raised parts. Quite chuffed with the finish. The decals that came with the kit gave me a fair choice and I went with the 3rd Infantry Brigade as that fits my choice of time and place.

I used a mix of pigments to create the dirt around the tracks and lower hull and splats over the whole hull. Mixing the pigments either with odourless oil paint thinner or for the thicker patches mat pigment 
binder. I wanted a dry look for the season though use of different binders can give a semi wet or wet finish.
I also used thinned oil paints to show dirt streaks gathering around and running off rivets and edged panels etc. I also added bare metal to areas than would see extra wear. I was restrained in this mostly but did a heavier effect on the interior as can be seen in the next image.


Whilst the kit comes with plenty of boxes and cans I wanted something different and found some resin additions that really fitted the on campaign look I wanted. The box of vegetables fits with the twin account details of French civilians showering troops with fruit and flowers and the trade that went off for fresh food against army chocolate and cigarettes. The rolled tarpaulin etc also are not quite drill book items.

The backpack and helmet was also part of the set I just added a strap from a bit of a pop can. Easier than I expected. The wine bottle is a Meng product, just a transparent plastic I simply added a cork/wax 
top and label.

As you can see it makes a fairly effective bottle of wine. I have three in the carrier, one as an empty. I found painting the carrier with an airbrush really helped generate different tones as I layered the different shades onto the model.

I also added a tin strap to one of the helmets that is in the carrier. The crew are all wearing berets so I needed to add the helmets. Two came in the resin set attached to packs whilst this one came from a weapons pack I bought for such use.
Crew all finished and their relaxed pose is just perfect for the scene I am trying to create. All told I think I took a little less than 30 hours from start to finish. 

I have also painted up a dead German and off camera is a French civilian, one of two the diorama will eventually have. I am now part way through painting up the two British escorts and assembled the three German prisoners and French girl. I would say I am about two thirds of the way through the project though I am not really sure the amount of time the base will require. 


Sunday, 10 January 2021

French Cuirassier With Captured British Standard. SOLD

 I have not posted here for half a year now as I was unsure if I wanted to continue with the blog given my lack of wargaming and for some time it had been posting mostly just another painted unit similar to the one before and the one before that etc. However now I am actually painting up quite a few other items just for pleasure I think the blog still has some life in it. I will still do the occasional unit but for the most part it will be showcasing either my busts or diorama's. I will do some backward posts but mostly I will be posting new finishes. Not having loads of spare space I will be offering my work for sale. 

The bust is supplied by CGS Military Figures as a high quality and detailed bust. They also do the option as full figure mounted on his horse, a very impressive looking model. It comes in just under 20 pieces that mostly have to painted before assembly.
The standard was captured from the 2nd Battalion 69th Regiment (South Lincolnshire) of Foot at the battle of Quatre Bras. It was quite a challenge painting the Union that was just attached to the arm and was difficult to hold without rubbing the paint off. Good job I have a good supply of rubber gloves!
Keeping with the flag I exchanged the wire that comes with the kit for embroidery thread, painted it gold and soaked in glue adding the resin tassels once it was dry. I think it actually is a better finish.


I used mostly Andrea Color paints but also a fair few Vallejo. I have started to build up a fair collection of Andrea paints with nine sets of six complimenting sets and their higher pigment concentration and the system of using them has really improved my standard of finish. I also used oils on the carbine to get a good woodgrain finish.

Next bust will be Napoleonic French cavalry again, this time a Hussar officer making use of a very generous present from Dave D, Scale 75 Green Colour set. Before that though I hope to finish my first 1/35 scale dio based around a bren carrier. 


Sunday, 14 June 2020

Young Miniatures WWII Commando SOLD

The first stage is a basic acrylic covering, the colours do not need to be super accurate and this is especially the case with the flesh. In this case I have used Iraqi Sand as per a painting tutorial. Over the grey undercoat and surrounded with so much green he looks a bit Kermit. 

Next up will be adding the oils and blending between the different shades. I have painted up a test on a spare head so have a good understanding of how it will progress.


I was quite happy with how the leather strap on the helmet worked out. Far less with the balaclava though this would look better once varnished.

In the end I switched back to acrylic after painting the skin, helmet and uniform as I was not happy with the colours I used for the webbing and backpack.

Bust is by Young Miniatures, these tend to be very well sculptured and great detail. This in fact is probably one of the lesser detailed models but still has bags of detail.

The plinth is from Model Display Products here in the UK. Quite a simple design so sits in the background. For my WWII larger busts I will keep with these if they look right.

It was the backpack that really broke me. Just could not get the colours I wanted from the oils but in the end happy with the mix of mediums.

Quite happy how the oils worked out on the tunic, it's given some nice texture making the fabric a bit more realistic. Took an age to dry though.

As usual the last bit was the worry. Adding a bit of camo grease to be more like the box art! Still got a long way to go before I get to an acceptable level but I am enjoying the ride.