Saka Light Cavalry

Saka Light Cavalry
Showing posts with label 54mm Project. Show all posts

Wednesday, 26 February 2014

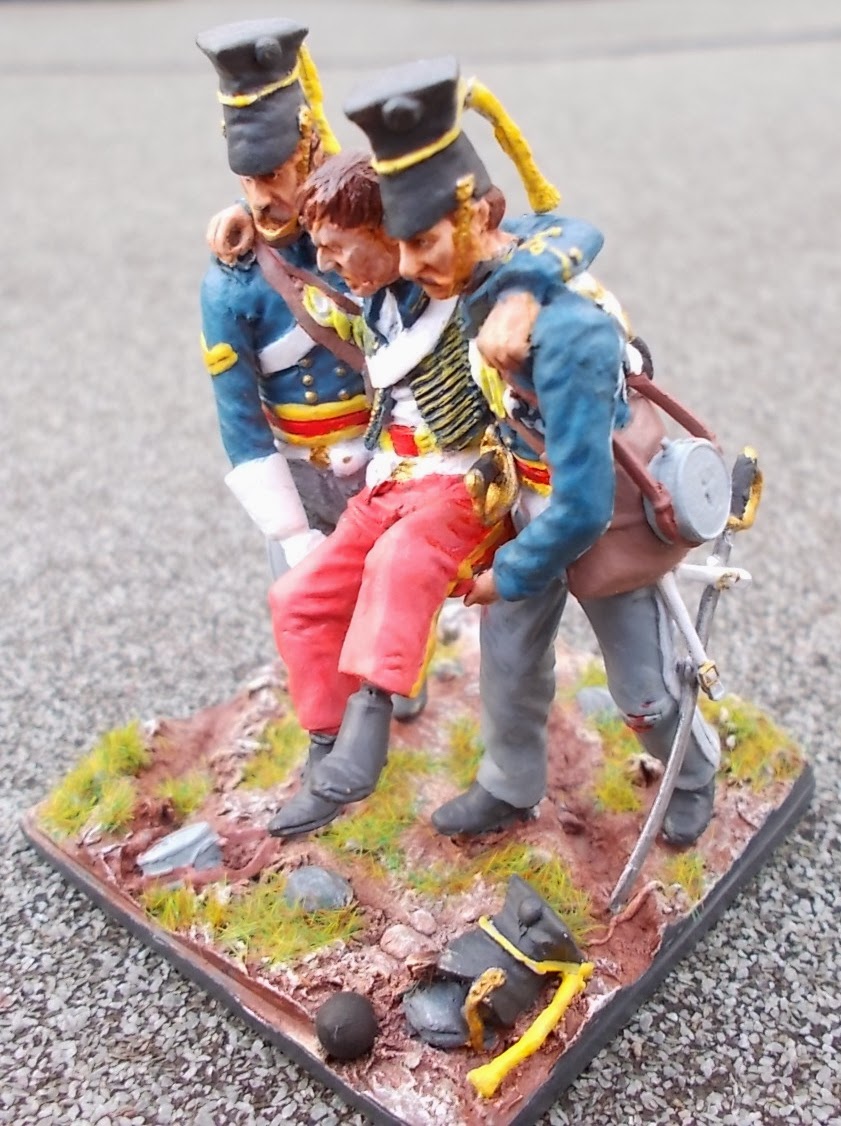
54mm Aftermath of the Charge of the Light Brigade

I bought this set of three figures around two years ago off of E-Bay knowing it was just for the fun of painting them. Fast forward too the a few weeks ago and little had been done to get them done, too many other must do projects.

As soon as the bonus round was declared I knew I finally had a great reason to do them. So I pulled together as many pictures of this model and paintings etc so as to have a good stock of ideas to draw from.

This is an old set and as such the detail is a little flat in places but still enough to work with. I did get this part painted when I knocked it and a box of finished models with my elbow. I still have a fair amount of touching up to do to get the finished stuff fully repaired (some I will chuck) and had to reassemble this one and take it back to base coat and start again. That took some of the shine off it for me but at least I had not added the swords as that would have probably caused me to just bin it, oh well it happens to us all....

I wanted the casualty to look like he was suffering so painted the eye area fairly dark but the rest of the face was a few shades paler than the two Lancers carrying him. Overall I was happy with the result. 

The belts that hold the swords in place are all the same size on the trees and needed to be cut to length which was fun given I had no instructions. Same actually for the canteens as these have to be glued in place and straps cut so that they fit to match the sculptured ones.

The braids on the hats also needed to be added, including the one on the floor. Missing was the spurs which I was trying to add with fuse fire but had to accept defeat as they just did not want to stay attached looking anything but spur like.

Close up of the faces, these guys won't win any beauty contests will they? Some of the detail was so thin that I really struggled in working out what each bit should be so it's no perfect finish for sure.

I had big hopes that this would show well in the bonus round but with so many great entries I have been placed rather low, though I will admit I am surprised I have had so few votes (mumble grumble) though I am very happy to report that the six I voted for are all in the lead so I have excellent taste  ;-)

Wednesday, 19 December 2012

Boy Your A Philistine

We had a teacher called Mr. Rose at my old school. I only really remember a few things about him. One was that he was a dick, another his favourite saying was the posts title. I remember his face when I politely asked him EXACTLY who a Philistine was. I had no idea myself but I gave him the impression I did, I have a feeling he never really forgave me. Oh well, I don't think I lost much sleep over that. Not that he learnt to leave me alone. Just as we were almost leaving school we had a free lesson he was watching over us (I think there was in those days a danger of unwatched 16 year olds self combusting), anyway he said in a rather loud voice "Willey you have that book upside down" I looked at the cover of my Sven Hassel paperback, returned the look that Rose was supplying and said in  more restrained tone "I guess that's why you never made it to being an English Teacher" He was less amused than the class mates.
 
I digress, so on to my Philistine which I have just painted up for my son. Now please understand that after being dropped on the floor this figure needed the flesh replacing and a fair amount of touch up and to say I had less tolerance that a shot down teacher I still wish I had don a better job but if I had put it to one side I think it may have taken weeks for me to finish it (again!!)
 
The skin tone post matt spray now looks a little on the grey side, a disappointment for sure. The figure is a 54mm New Hope Design sculpted from images of Ospreys Men At Arms. It has to be said that the quality of the castings for 54mm in today's market is not fantastic. For the time they were released I assume they were fairly good but I bought a few on e-bay and price V quality I feel the winner. Most of all it's low cost practise at the larger scale stuff. I have another to do and then I will tackle another base that I am really looking forward to with three figures on that will take weeks of work. Something for me to really get my teeth into.
 
 
The drop also ripped the arm just above the elbow. I have never seen this happen before. The arm is still firmly in one piece but it has two of these rips. I painted up the viewable side as a scar and it felt very much like I had played a get out of jail card. The hide shield was the same method as I use for the 20mm figures. This is to add the off white to the whole shield and then add the brown over the op whilst it's still wet. This allows the two to mix together a little, especially at the edges. I am reasonably happy with the effect at 54mm.
 
I will return to the base at some point, adding real sand and painting this up through a few colours. The textured base did not really lend itself to dry brushing. I also need to find a wooden base to finish it off fully.
 

Cath thinks he looks more like a Zombie that a warrior. Me I just think he is scared which I like. Still my son likes him. Not so much for the figure itself but because Daddy did it just for him and he watched it develop over the days I worked on it and that at the end of the day is what matters.
 
OK the final day before the Painting Challenge begins. I have been out all day actually playing a wargame, report on that coming up in the next couple of days. I got home this evening expecting a final parcel of 28mm WWII figures. These have not arrived so may well turn up tomorrow. Not an issue given the amount of figures I have already prepped and anyway I would do no more than take them out and look at them. So only thing left to do is wish ll other Ronin the very best of luck and see you in the field of battle. For all those who really turned off by this challenge a big sorry but I promise to be posting other bits and bobs between the wall to wall painted figure posts.
 

Tuesday, 21 August 2012

54mm Project Stage 4


I went with painting up the red facings, collar and epaulets. These I did in basic Red, highlighted with Scarlet then Game Colour Bloody Red. After this I darkened the basic Red for the creases and added German Orange to the Bloody Red for the final highlights all of which seems to have melded well.

Now without any more excuses I moved onto the black. I simply added a single drop of Blue Gray Pale (the darker of the two greys) layers it over almost all the original black. I followed this procedure four more times, each time covering less of the areas until I had a mid to dark grey that I just touched up the Shako's rim and peak as well as very little of the gators. Not withstanding it was my first time at painting a large area of black I thought it went really well and am 100% happy with the result.
The shoes were finished off with a coat of Black Indian Ink so that they shine.
From here it's just touches, the rope work on the Shako started off black so I just dry brushed Ivory and then White over that so the cording stands out. The Eagle and the rosette fairly simple single colours and the Pom Pom Andrea Blue with a heavy Blue Shade wash gave it some nice depth. The rifle stock started Leather Brown and I added Red Leather to the Brown, painted over the original coat and then added more Red Leather for a third layer. Each layer shows through some so you get a hint of grain. The base was Panzer Aces New Wood in an attempt to show off the base at it's best.

All told I would guess at somewhere around twenty hours of painting has gone into this figure. After varnishing I added highlights of White Gloss to the leather belts to set them apart from the rest of the white. It's been a blast doing this project. I have five more on order, four of which I picked up for a song whilst the fifth is a three figure set that I will do once I feel I have this larger scale nailed.


This picture shows the backpack, ammo boy and bayonet that had to be glued in place.as did the nearest coat tail.

This shot shows off the detail in the muskets lock and how the glued parts fit, no way could it be cast as such.


OK I finally show a close up of the face. Cath thinks I should repaint the left eye but I like that he is squinting, kind of makes me think someone is trying to do him harm as well. It also shows the depth of colour through layering the paint and ink washes.

I like this shot as it shows some of the detail and the shading on the trousers. The musket looks really long in this shot. Mind you I am just glad it staying in one piece as I bent it a couple of times as I was painting the figure itself.

Nice shot of the figure from behind. The light picks out the texture of the pack and blanket roll.


Again I like this shot as it shows off some of the detail such as the Shako cords that was more or less dry brushed just using the detail of the figure rather than trying to paint it in.

You can just about see the shading in the inside of the Shako, I wanted it to be fairly low key, though in the flesh it is more prominent that in the pic.

 Anther shot I really like of the figure.

OK thanks to everyone who took the time to put up with my ramblings over this project, as you will have noticed I had a buzz going for it. All the pics in this segment were taken by Cath whilst all the earlier ones  were my effort. So tanks to Cath for making my work look good and onto the next project.

54mm Project Stage 3

It's time to face it. Well face him really. For 28mm I use two skin tones and Devlan Mud wash (well till it runs out). But I had already bought Flat Flesh to go between the Medium Flesh and Light Flesh. Well after painting the first two colours on I was tempted to leave at that point but did not. The effect of adding the Light Flesh was to spoil the effect, that is until I returned to the Fleshtone Shade wash. This really dulled down the too light look and brought out the depth of the rest of the flesh tones. I am rather pleased with the result and hope to carry this forward with future 54mm figures. Yep I am enjoying this so much that I have bought a few more. I figure I can use these in future for other giveaways and the like, or just keep them if I wish.
I also have painted the backpack and bedroll as well as finishing off the white leather straps. I wanted the bedroll to be a slightly different colour to the uniform itself even though all the pictures I have looked at seem to have the same shade. I think this is in error as colour matching to the uniform (almost certainly another fabric type). I did this by using the same Blue Shade wash as I used on the uniform but this time added over a Blue Grey Pale base layer. This came up close enough to match but can not be mistaken for the same colour. The backpack I managed to sneak English Uniform for the base coat. Then I dry brushed/dabbled a series of lighter colours finishing in Buff. Brass Buttons were then done post clean up of the white areas.
The Black areas have been painted with a base coat of Black. I also painted the gold and bronze areas black so natural shading are in place. The next step will be either the red facings or finish the black which is as big a challenge as the white was.

Monday, 20 August 2012

54mm Project Stage Two.

With me happy with the Trousers and not wanting to work on the rest of the white items until the buttons and facings etc. have been worked on it's on with the coat. Whilst not quite the challenge of the trousers it's still going to be tough to get the shading to be subtle enough not to appear blocky. This may well be the only stage I complete today.

I started with Dark Blue and worked up the shades a drop of Ivory at a time. At about four shades I gave it a blue ink wash then repeated the lightening effect and finally three coats of ink to meld the shades more smoothly. The pictures make it look like it needs more work but when looked at inside it looks much better.

I have painted over a few white leather straps but these can now be picked up whilst tidying up the rest of the white.


French 67th Ligne 54mm Project Stage One.

OK  assume you remember the very kind gesture from my friend (the loaning of the house) well a few weeks before he went on holiday I asked him if WWII was the only period he was interested in from a military point of view. No was the reply he also liked Napoleonic Wars. Well that was what I was looking for, now I could find a larger figure and paint it up for him. It's been over twenty years since I last painted something so large so it's going to be a challenge. I plan to record my progress as a series of posts that will be released once the figure has been painted and delivered. I am both excited and shiteing myself!

9th August. Miniature arrives, well the second ordered one arrives after the first was not due to being discontinued.Originally I went for a British Infantry soldier taking leave of his wife, now is the turn of a French Man in action, a total change of pace.

I knew it would not be a single cast but both the number of parts and make up of the bits was a bit of a shock! Both arms need adding which is fine but also the right hand clutching the musket! Now that means I would have to marry up three separate pieces that could not be even a fraction out or the figure would look crap. No pressure then. Once I started to assemble the other parts it became clear why they benefited from assembly. I still wish than hand came attached though.


Assembled and ready for action. I managed to get the arms and hand aligned, not sure how but the end result looks fine. I really would not like to have to do it again though.

This shot shows the bayonet sticking out and is one of three parts glued in the same area. It also shows that bloody hand which I had filed slightly to get the right finished angle. I also cut a small amount of the barrel off for the correct fit.

This shot shows the level of detail on the figure which is great. I am really looking forward to painting it up. I have now undercoated the whole thing and plan to paint the base first, just where from there I have no idea.

Undercoated the figure in white then once dry set about working on the base. The battle the figure is based on was Aspern-Essling or Wagram as some may know it. A quick Google search and I found a few paintings that showed the buildings to be made of brown to yellow stone so armed I made for the brown based wases.

First up was the Vallejo Umber shade. Next the Sepia which gave a nice yellow effect to the rocks. The Umber had given me the dark brown finish between the rubble which I will add smaller ballast type debris as well at a later stage. Then it was a case of dry brushing three shades from brown to light yellow one over the other. Still need to do a spot of minor over highlighting and a tad of darker detail to finish it off. I am resisting tufts and grass as this is recent buildings turned to rubble.


I skipped the boots and went straight on to what is one of the biggest challenges. White trousers, I know white can be tricky in smaller scales but this guy has stacks of it. Trousers, waste oat, inside of the coat and coat trim not to mention leather belts! So I started with Blue Gray which is fairly dark then over painted most of the areas with Sky Grey just leaving the most shadowed areas Blue Grey. Next up I watered down Ivory and washed the lot in that following up with neat Ivory that again was used to cover a fair amount of the trouser but leaving more areas uncovered. Next was the Standard White which was used on the most raised or flat areas, mostly applied in stripes. Another thin wash, of paint this time White that was allowed over all the trouser area and this was applied in about four layers, drying between. Then I highlighted some more in Ivory and White where I wanted it to pick up some more. The grey as you can see shows through a fair bit but I really like the effect. All told it took about two hours to get the trousers done, if not for the heat it would have taken much longer as the paint quickly dried.

I just added the one coat of blue to the coat and inked it, I also applied single coats of White or Ivory to the other areas requiring a white colour. The plan is to repaint the leather with a different white once the figure has been varnished.