Saka Light Cavalry

Saka Light Cavalry
Showing posts with label AAR. Show all posts

Friday, 3 September 2021

Two Games of August

 I have actually played three but only have the pictures from two of them. So just a quick run through based on a failing memory....

Another tilt against Matt, same armies but with a few more points. We did better with the rules but Matt continues to stink up the room with his dice rolls.
I on the other hand was rolling laver, this helped me with some questionable decisions but again the light troops seemed to do better against bigger units by disordering them on a number of occasions. 
Matt was able to clear away my skirmish line but unable to do much else allowing them to go back in.

My guys on the left run from the Persian skirmishers whilst my Cretan's watch. Fortunately I was then able to clear his troops away and continue to march forward.

My skirmishers on the right were doing much better, though we were to more or less wear each other down over the following turns neither able to get an advantage. However Matt was also wearing my cavalry down as it was much weaker on this flank than on my left.


The main action was on my left with Matt sending in his Cataphracts against my Agema, I had managed through eye watering rolls seen off one regiment whilst I was certainly losing another but through epic rolls not quite breaking.

But all good things must end and ended with a rather poor roll. Matt's quality then started to take over and my left wing was crushed leaving the ever vulnerable infantry phalanx's at risk. I did have the pleasure of seeing a Gallic warband hit one Phalanx and whilst it just survived the first round was not going to stand beyond that. 

Whilst we did not fight to a conclusion it was obvious the winner would be Matt. So after two games of Hail Caesar we will try Napoleonic 6mm with Matt trying the rules Lee and I worked on. Which is a nice link to....

Lee, my son Joseph and I have joined Chesterfield Open Gaming Society (COGS) which seems to be a retooled version of the club I used to go to in Chesterfield YMCA, certainly plenty of old faces there.

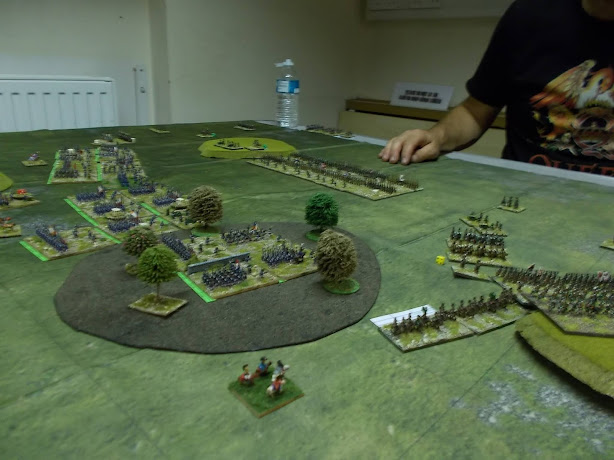
So this is our third visit and this time Lee played his Russians against James and me with the French.

The issue was that I had left the rules at home and Lee had not taken a set away so we were without the rules and trying to work without the charts. We did fairly well but I was rather annoyed with myself. Still we had a good game.

Joseph sent his cavalry against Lee's on the far left after Lee instigated the attack. His use of combined arms a timely reminder of how effective it is. Meanwhile on the right I was sending my light infantry through the woods after Lee had moved into it whilst keeping the rest of the Division back.

I had the heavy cavalry which I first moved towards the centre as Lee used his heavies to threaten Joseph's infantry with some success. Lee was to pull back when faced by my cavalry's move but we did not get chance to fight them as I had thrown them into his infantry.

Joseph in the centre about to be charged by Lee's heavies, Joseph did not have light infantry so his movement into the woods was slow going.

Lee's light cavalry had made a bit of a mess of Joseph's light cavalry and a foot battery but Joseph's response was to give him a taste of his own medicine. First defeating the weak Cossack division and then facing the better quality second line of cavalry.


Lee had two divisions of infantry to my one (Joseph had two to Lee's one) but I had cleared the woods and was starting to reposition the infantry to make it hard for Lee to drive against me and for good measure had sent my heavy cavalry into his weakened division. I should have taken the option of falling back but having kept in contact with his squares I was being sucked into a lengthy combat. One I was sure to win but it would leave them vulnerable to Lee's still strong heavy cavalry.

On the left Joseph was closing with Lee and able to either press the one Division of infantry with his one or threaten Lee's centre where he would then dilute Lee's strength of cavalry. By this point both Lee's and Joseph's light cavalry had reached their forced retire orders through mutual combats. Joseph effectively winning that battle as he had also dealt with Lee's Cossacks.

The shattered remains of Joseph's cavalry that was now limping off the field. This is the point we had to end but it still had plenty of play left with either side yet able to make a successful breakthrough. Still plenty of tweaking yet to happen but it felt like Napoleonic's and looked good too. We typically use these rules for BIG games and they work well with them. Club size games has been put under less stress. I think they will clear down to a nice set of rules.

We are back next Monday but changing to a Gunfight using Dead Man's Hand, that should give us a nice quick game or maybe two. Nice to get the opportunity to play again.


Saturday, 17 July 2021

First Game In...........................

 Finally got a game in and it was against Matt, a Macedonian V Seleucid tilt, only 500 points to get back into it and were we rusty!

I had the Macedonian's and wondered why I had so many more troops, his cataphracts cost more but I was starting to worry I had miscalculated. Turned out I had not and some of Matt's choices are point heavy. This was to tell at points in the game.

Both of us really struggled with getting troops to move forwards with my left wing flying ahead before stalling and started to really suffer from skirmishers nipping at my now exposed cavalry.

My far right faced off against the same light cavalry and whilst Matt won the first two rounds he was unable to break me and in the end we both well back shaken and disordered.

Matt would regain his order before me but neither had the opportunity to challenge the other for the remainder of the game as rolls were getting worse not better.

Still on my right and still unable to move a thing! My only saving grace was Matt was not able to move either. Matt would like you to know at this point I had moved most of the way back to my start position, he was not wrong.

Meanwhile half of my phalanx had been moved forward to threaten Matts Cat's, the rest was struggling as much as my cavalry.

The big face off would be on my left as I faced four units of Cats with my three units and a light cavalry unit, see above left as he threatens the mighty Cats.

A close up as he did so well. Not getting many casualties dealt but was the king of disorder on those Cats.

I had some success driving back Matt's annoying lights but the damage was already done.


Meanwhile the only movement seemed to be my lights pushing the Cat's back, I was fortunate that Matt failed a few pre move disorder removal checks or I would have had both flanks crumbling at once.

It's a funny old game, if I could just have attacked I could have taken advantage of this situation but alas.

In the end I against probability drove Matt's right most unit back disordered. I had support in the other but Matt rolled well, I rolled the opposite and oh well scrub one unit of mine.

It was my turn but Matt could make a move and so positioned himself for a flank charge, looks very much a bad situation but the rules whilst not allowing me to counter charge did allow me to wheel and meet him halted and not in my flank. It would have been different if it had been an infantry unit.

Back on my right things continue to not do a lot.

Finally the blocks crash into each other, well as I can't counter I stood and took it on the chin. My supports helped to keep it close as whilst I lost more casualties it still counted a draw.

Round two would have favoured me as long as I got my other two blocks into the scrum. I suspect the melee would end up splitting down the middle with both sides more or less spent and little to offer the rest of the battle.

I had survived the almost flank charge but could not afford to be pushed back which was a real possibility having lost the first round of combat. Given that we stopped at this point it's a mute point but we both agreed that no matter what happened here the game was up for my guys as both flanks had to go Matt's way whilst the centre was going nowhere at best.

No doubt we could have done better, both failing to get round to reading the rules and I especially should not have been pushed around as much as I was. Got to get better at owning the edges but I will say the dice did not like either of us but seemed to dislike me more. Matt though did make the best out of the chances he had.


Friday, 27 March 2020

Command and Colors Napoleonic Lockdown

So working for one of the unnecessary retailers I have been sent home to cool my jets for the next few months. Yes you read that right, this is not going to be a three weeks and back kind of things. I am confident that it will be at least two to three months before we can expect to be making our way back to work. This of course will allow for some things to be better. Today was the first day that I was free from going to work (close down stuff) so it has been marked by the first of what I hope will be many games with Joseph of Command & Colors Napoleonic. We also have ASL to play as he has played a couple of scenarios and last but not least I will be running a roleplaying campaign for the rest of the family as well as playing our huge collection of board games. So much welcome family time between the kids homework and my hobby and house duties.

So todays scenario was from the original release Salamanca (British attack on French Right) 22nd July 1812. The situation in the photo was taken about half way through the scenario with my only cavalry unit long since lost whilst Joseph's British cavalry has forced one regiment into square but he failed to cause casualties and my fire had reduced his two regiments of cavalry to the point of not being too much of a threat. 

In the end I was able to destroy both regiments of his cavalry when he ran out of cards and then we fought over the building hex near the rived Pela-Garcia with me finally getting it back for good as the British losses brought him close to defeat. We always play that I need an extra banner to required. 

In the end he just did not have the cards to co-ordinate his attack and I was able to pick off his regiments when he could not withdraw them behind his lines and took my 7th banner (he lost a leader when a unit was removed).

Given I have the first four expansions we are in place to play through quite a lot of scenarios, so we will play out the last two scenarios from the base set then back to the expansions that have for the most part had just a few games played from.

Friday, 31 January 2020

First Game in About Two Years

FINALLY I got to play again :-) So Wednesday night I went over to Matts and we played a SYW Blackpoweder game of 777 points.

I was the Prussians (on the left) and Matt had the Austrian's. Lee and myself had based our units to our own base size and unit size so Mat and my bases did not all marry up and Matt fielded two battalions together to look a bit more like mine.

Matt had loaded one flank with cavalry whilst I was mostly even. This meant I had to turn round one flanks worth and fly across the rear of my infantry to give them a hand. Meanwhile I was trying to fend off Matts dragoons with a dragoon and a hussar unit.

My Hussars lost the first round and Matt did a sweeping advance and against the odds then lost the melee becoming shaken. I lost the dragoon v dragoon one but not the unit.

This however allowed me to charge both his dragoon regiments sending them from the field but I did take casualties making myself vulnerable to his cuirassiers.

I should have been in a great position with three fresh regiments turning up but on charging his hussars I did really poorly and this left the whole of my cavalry with fairly high casualties. This was made worse when my C-in-C blundered.

One battalion of infantry had been disordered and I failed to get two moves so unable to pass through the forward unit and things would start to go bad for them from this point on.

Matt got two units of light infantry round my flank, of course I got disordered and suddenly nothing on that flank could move. Time for another blunder methinks.
Just before Matts cuirassiers carve me up my cuirassiers are shaken by Matts very expensive hussars. He was a very happy chap they had done so well. Lots of laughing in our game but at this point mostly Matts lol.

One of my battalions blundered (I referred to it above) and he moved right into close range for Matts artillery and a battalion of infantry and that is all she wrote for those guys.

We made a few mistakes and had heads in the rules as neither of us had done enough pre-game reading and remembered things a bit less than we thought but we still had a heap of fun. Next time I think we will have a better idea and should get a better balanced game.

Thursday, 10 August 2017

Command and Colours Napoleonic Battle of Pultusk AAR

I have actually played a few various games of late most of which I have as yet failed to write up but may get around to them. This ones a bit special as I played it against my son The Boy. Habit is a terrible or good thing depending on the habit.

Me and The Boy have got out of habit playing C&C:N but as I had taken the week off work last week it gave us a great opportunity to have another go. As always I gave him the pick of module to play and sides once a scenario has been picked out. I own all the nationality sets (five) but have yet to buy the more recent additions. Unfortunately beyond the base set we have not had a great deal of play so it was good to get the Russians out.

I got the Russians and we played the battle of Pultusk fought on boxing day 1806, Marshal Bennigsen ignored orders halted his retreat and gave battle. This is quite a big game with the board crammed with units. In the actual battle the French won a narrow victory on the day but both sides suffered heavy casualties and the Russians withdrew during the night.


Battle from my perspective, looks like the Russians have the numbers! In infantry it's almost equal, I have 14 the French one less, I also have an advantage of one more cavalry with four cavalry but also have three Cossack cavalry but these are only two strength so are not expected to have a major impact. My biggest advantage though was artillery, I had five units to my sons three which historically was a big advantage as it forced the French infantry to surrender their gains when bombarded.

Each C&C:N nationality have traits that add flavour to the game, this is really well done and of all the Command and Colour series I think this one carries through the best. My Russians tend to get a Mother Russia roll that adds troops to their forces. The thought behind this is the fact that many units enter battle reduced in strength as are not fully mobilised, as such many infantry units start under strength (just three blocks opposed to the usual four). You roll dice equivalent to the number of command cards and these give you troops or emplacements when in effect. I failed to gain any infantry but managed to add two Cossack units, strengthened two artillery units and added a field works to a hill where I had one of my gun units.

C&C is a card driven system and if you use try to plan ahead you can really increase your chances of winning. The Boy has always shown the ability to plan and generally does well when we play. This scenario needed the winner to gain ten victory banners including some location ones that tend to channel the fight to key terrain. When playing The Boy I always have to gain one more than required as a form of balance. It's not unusual for The Boy to win with me still needing to get the normal required banners but it's nice when I get the normal number and he gets there before I can get that extra one.

In this game I did get a good run of the cards early. I lost all the Cossacks before the end of the game but they did more damage than expected. Their loss is not an issue as they do not count for banner gain so they are disposable.

The Boy stuck to the original script by forcing me off the first line of hills and then In turn was forced by my artillery to abandon them. However he never really got going on my left flank and as such never really threatened the woods that he really needed to gain much needed banners. I had sent extra troops into that area and both of us suffered heavy casualties but when the dust settled he had just the one infantry unit able to threaten the woods.

My left flank had also seen plenty of action but again no real threat was able to get past my first line of defence. Whilst many of my infantry units were reduced to single blocks my artillery were there to punish any units that tried to get through on that flank.

In the centre I still had a lot of strength that I could have called on if required. The Boy had lost most of his guns to cavalry attacks and his cavalry had been almost totally destroyed through follow on attacks from my cavalry when he brought these against my cavalry. Indeed he suffered many a bad roll in attack which set the tone in the centre. The fact that I still had all four artillery units on board to his one really made this so difficult for him.

In the end he just did not have the strength to push through or the opportunity to replace worn units in the front line with fresh units as I seemed able to pull the required cards whilst his units got stuck in the open close to my troops.

It was a fun game, both of us had a great time though I suspect the scenario could be a bit pro Russian. It's scenario three from the module and as we tend to play from front to back shows how few games we have played from this set. I am sure though we will be playing yet more in the near future, just from which set?


Sunday, 18 June 2017

Han Chinese Persian AAR

Over a month between posts! Well whilst painting has been on an all time low I have been playing games, just not recording them. Hopefully I will get back to normal and get posting again. I have a Saga game this week and a Black Powder game the week after if all goes well. I have even started to paint more regularly again with a couple of 15mm units finished this week just waiting to be photographed.

I have had a few games of Hail Caesar with Matt recently and another with Lee. My Persians have not done too badly so maybe I am starting to use them correctly? Probably the dice have had more to do with it with two games having molten dice. This then is the other game played against Matt.

The thing about the Persians is you get a lot for your money. A lot of low cost units that is. In the distance you can see the Han whilst I have enough troops to wrap round them if the terrain would allow.

On my left flank I send in hoplites and two units of levy bow infantry. These are facing Matts only mounted force so have to be careful, I do have one of three mounted brigades just to the left in the photo that should help some.

Only trouble being that they don't much like moving forward. Matt and his group have developed a few changes to the basic activation rules giving a bonus for units and formations over a certain distance. This usually means whilst at distance you can get a few moves a turn.


On the opposite flank I charge my cavalry into Chinese infantry. In Black Powder crossbows have a few restrictions and other bonus abilities a definite disadvantage is the inability to use closing fire. As such I charged some cavalry units in his infantry on his flank. This is risky as a roll of 6 can cause you a MC that low rolls can cause some nasty effects. Also the cavalry have a 50/50 chance of becoming disordered, in this case I got lucky.

I still had another cavalry division waiting the results of the first attack before being unleashed for a clean up attack. Or they failed to get any moves!!

Back on the other flank I try to bring the Chinese chariots into melee but Matt keeps dropping them back to allow his bow armed crews to cause casualties but I have good save rolls allowing them to continue to march forwards in the hope of finally catching them.

Matt sent his bow armed light cavalry up to my right hand cavalry division in an attempt to get me to charge and in the meantime push up my casualties. This was partially successful but my cavalry are armed with javelins so it's not all one way traffic.

The centre was for the most part rather quite as I struggled to move forward. My right hand cavalry has come back from a bruising round or two of melee and needs time to get sorted out.

Disaster for my hoplites as Matt gets a open flank to charge. He went on to destroy these and move on to the second unit destroying those as well. The first time Matt can remember such good fortune for his cavalry.

However in the middle I had the advantage and was just starting to force the two wings of his army apart.

On my right I had broken some units and now can both more troops most of which were in great shape and the ability to strike from a distance.


One of Matt's brigades on my right was broken and a second flanked and bent back. All the mounted units are mine in the image above with one retreating Chinese unit in the middle. My task here was to get the most forward cavalry behind the Chinese cutting off their retreat whilst bringing the rest around the flank and the infantry to close quarters and simply attack with whichever units are presented the Chinese rear.

We called it at this point, my cavalry had managed to not only charge home against Matt's infantry but won most of the melee rounds causing Matt's position to become impossible to hold.