Saka Light Cavalry

Saka Light Cavalry

Thursday, 3 December 2015

6mm Ancient Progress Report

So the 6th Annual Analogue Painting Challenge is now less than three weeks away. I have entered two side challenges this year. Most Ancient points painted in any scale and most points painted in 6mm. Given that a fair amount of my 6mm will be ancients it kind of dove tails the two together nicely. This got me thinking that I had yet to show off my 6mm army as it stands, well I had to do something about that.

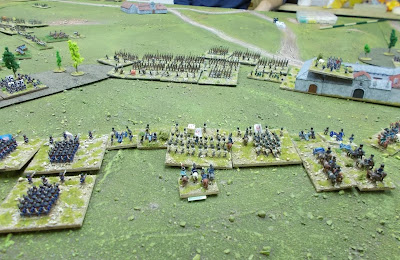
Indeed I had taken the photo's of the lot when I finished off the three companion cavalry bases about two months ago. As you can see it's really starting to take shape, I still have plenty of figures in hand to further increase the force but will be getting even more post Christmas as I really want to push the size up a great deal.

I want to get the sense of mass and the pike really help with that. I have enough figures in hand for another three blocks but will buy more as I need at least twenty eventually.

As things stand I have enough figures for a couple of Thracian medium infantry bases, at least two more light cavalry with bow as well as two companion bases and a single Hoplite base. I plan to paint up all these during the challenge and for the 6mm challenge can move onto a bunch of already prepared 15mm Persian and Macedonian cavalry (3 units in total) and one unit of Hoplites. I still have plenty more 15mm not yet ready for painting if I manage to get through all these. 

I still have a load of part cleaned up 20mm Celts and a load of 28mm Vikings that are close to being ready for the brush.

I will though also take the opportunity to get on my way with my 6mm Polish infantry and Italian Cavalry that will be needed for some future games as well as yet more Italian Infantry.

Sticking with 6mm I also will be making a much needed push into The Boy's British Napoleonic's starting with his heavy dragoons and rifles. Then I have both Lee's and my ECW, so I guess I am OK for the challenge regards possible points in 6mm :-)

Wednesday, 2 December 2015

Battle of Bautzen 1813 Part II


The French continued to keep both bridges under pressure but was looking less likely to cross over. Prussian reserves were moving towards the twin spanned bridge in a bid to force the French back.


Further towards the centre the French were now very much on the defensive, Lee was trying to be aggressive over the majority of the battlefield, so far I had been able to repulse all attacks but not of these attacks had used the full force of the brigades engaged.

Lee's attempt at the twin arched bridge had left his attacking force in disarray, here two battalions are under retire orders (yellow die) leaving the available troops rather exposed. Lee was having some shocking rally rolls.

At the central position Lee's Saxon troops were still at full strength, these troops started to move in for the attack. Being the only full strength Brigade left of Lee's at start on board troops. My Prussians facing him was also close to full strength.

As can be seen my troops facing the Saxon's has their left flank drawn back though I have two battalions in the woods  and a cavalry regiment poised to charge into the flank of the attacking Saxon's.

The French facing the rightmost Russians were also starting to move forward along with a couple of cavalry brigades. Up to this point most combat in this area had been our artillery taking pot shots at each others infantry.

Fresh French troops on my left are again moving forwards after the previous testing attack had been beaten back. This one looks a lot more determined.

On my far left Lee continues to push troops against the farm and hill. This attack has had troops fed in a few at a time and has never really got going but is taking a steady toll on both sides.

 The Italians attack across the small bridge again in the face of my weakened forward troops but I still have very strong reserves to commit against this attack.

However I did not need to bring in these reserves as the forward units were able to rout the single battalion. I really want the Italians to at least stay in this corner. I need to break through at the next bridge and then launch an attack on the Italians from two sides.

The Prussians gathering for an attack across the two arched bridge. With more than double the force of the French we have a good chance of forcing the crossing.

I manage to slow down the Saxon attack by charging my cavalry at the flanking battalion forcing them into square (red die) but that will not stop the main body from continuing the attack.

A view of the Russian positions, the Guard Cavalry are to the left bottom corner and are making their way to help out the Prussian cavalry fighting off a French cavalry attack.

One of the major attacks of the game finally kicks into gear. I have less troops but fighting in cover of the town should reduce much of the advantage Lee has. I also have reserves that I plan to plug gaps and counter attack where required.

Another turn ends with me feeling quite confident in the way the battle is going. I am about to go onto the offensive in the Prussian sector whilst the Russians look to be capable of holding the French off until the Prussians can help.

Friday, 27 November 2015

Friday Quiz 22


Another five questions to test your knowledge

1. Which battle in 1071AD saw the virtual destruction of the Byzantine Empire's regular army?

2. What were the three divisions of a medieval army called?

3. Who said, "General Lee, I have no division"?

4. Where in September 1931 did a serious mutiny take place in the Royal Navy?

5. Which island off the coast of Scotland was used during WWII for anthrax experiments?

I think this ones a bit tougher than usual, lets see how you all do

I think a mix of Thanks Giving and harder questions reduced the number of answers.

1. Manzikert.

2. Got some great detail to this one but Battles was what I was looking for.

3. General George Pickett at Gettysburg.

4. At Invergordon, among ships of the Atlantic Fleet.

5. Gruinard.

Monday, 23 November 2015

Battle of Bautzen 1813 Part I


On my first Sunday off in four weeks I was able to take The Boy over to Lee's and get the Bautzen game started. The Boy decided to fight on the same side as me and so took two Prussian Divisions nearest the open edge. Unfortunately these were  stuck behind the river so would possibly have the least action of the allied troops. I had the other Pussian Division the Prussian reserve cavalry and three Russian infantry divisions.

Lee was commanding a mixed bunch of French, Italian, Saxon and Wuttemburg troops that spanned the quality range between Old Guard through to Milita. This should be interesting.

The first turn saw The Boy and myself happy to stay in our positions and fire our guns into the slowly advancing French. 

The Boy set about reducing the Italian cavalry just as soon as it was in range. Seems the curse of the just painted was going to strike again. Not good news as the two Battalions directly behind have also just come off the painting table.

Lee steadily moved forward on his left flank and in the centre. Looks like he plans to try and take the bridges rather than cover them and hit my centre. The Boy was quick to react as he started to move his reserve into the bulge made by the river.

I had a single battalion out front with the job of slowing down the attack and causing as much trouble as possible. Unfortunately the farm was not proving to have thick enough walls and the battalion was quickly reduced to half strength.

The Saxons and French divisions towards their right flank start to move forward now there flank is protected by the captured farm.

I wasted the three Cossack cavalry units gaining neither time nor weakening the French cavalry. I would have been better to have kept them for attacking already reduced units rather than facing fresh cavalry.

But Lee also was quick to come to blows with his Division cavalry which was to allow me to have an advantage when stronger formations came to blows.

The French attack towards Bautzen was now developing, my troops would be outnumbered but had strong walls to protect them, would this be enough?

Lee brought up his Italian Division to try and force the small bridge. His fire was able to force back the one battalion but he was also taking casualties. I was quite confident that the attack against the bridge would not succeed. 

A little along the river Lee manages to get a single battalion across the large bridge and has four more battalions lining the river in an attempt to push The Boy away from the bridge. However with three fresh battalions close to the bridge he elects to stand and fight. The French battalion is quickly isolated and driven back across the bridge a shadow of its former self.

Blocking my way to the battle for the bridge is three battalions of French infantry. My Prussian cavalry has forced them into squares but I just can't get infantry up to smash them so a time consuming charge and retire cycle of actions take up the following few turns. I really needed to get these battalions away from the river to open a fresh attack of my own.

The French launch an attack to the right of the captured farm. This ties up the troops earmarked for the attack on the larger bridge and will possibly change the course of battle in this sector.

One of my cavalry regiments is under compulsory retreat (yellow die) but has bought me yet more time on this flank. I would be able to rally these cavalry back and bring them back into battle again after a few turns recovering their order. At this point the battle seems to be mostly going my way.

I continue to cause problems for the French, forcing infantry into squares (red dice), the attacks so far have been a little disjointed and most have lacked much in the way of support. However greater numbers are massed in the rear.

The Italians clear The Boy's Prussians from the little bridge, the Prussians are at this point quite weak but have troops close enough and in large enough numbers that they could contest the position if the Italians cross over.

Not that the Italians lack numbers with eleven battalions a light cavalry regiment and a battery of guns at their disposal. Still a maximum of two battalions can cross per turn, a double move may be required to get enough mass in place to stay on the Prussian side.

So neither side as yet have managed to get any real advantage, Lee is building mass in a couple of points but still continues to send in attacks that are not closely supported whilst I continue to fail to dislodge the French squares blocking my approach to the larger bridge. I also continue to remain mostly passive on the hills leaving it to Lee to make the majority of the aggressive moves.

Sunday, 22 November 2015

The Sixth Annual Analogue Painting Challenge and Side Duals.

The call for Curt's Analogue Painting Challenge has again been made and of course I have again taken up the challenge, I mean why would I not? 

This year as you will already be aware will not be a large showing for me as I just don't have as much time to paint as I have in previous challengers. The only thing I have going for me is that the winter weather should allow me more painting time on my days off than in recent months.

However I still feel I will have enough in the tank to make two challengers

Most points in 6mm. 
Each of the last four painting challengers has seen me run off a lot of 6mm, this year should again see this as a fairly major part of my painting again this year as I want to get my Macedonian army into gaming shape. However I also want to be far more varied this year so whilst 6mm will feature heavily I plan on doing plenty of 15 and 28mm

Most points in Ancients.
A bit of a cross over, I do have both 15 and 20mm Ancients as well as the 6mm so will be hopefully getting a mixed bag of points.

So does anyone fancy taking me on this year in a little side challenge?

Friday, 20 November 2015

Friday Quiz 21


Fresh from two nights wargameing on the trot here is the quiz.

1. What year was the Battle of Bosworth Field fought? 

2. The Coldstream Guards is the oldest Regiment of the British army but for which war was it raised?

3. Name the king of Spain who's death triggered the Spanish War of Succession?

4. Name the first and last wars Armoured Trains where used?

5. Other than their religious links what links the Sexton and Bishop in the WWII Commonwealth armies?

A couple of odd balls this week, lets see how you do.

1. The battle of Bosworth was fought on the 22nd August 1485 and one hundred and fifty seven years to the day that Charles I raised his standard at Nottingham to signal the start of the First ECW.

2. The Coldstream Guards was raised by George Monck during the Second ECW (really an extension of the first) in 1660 as part of the New Model Army.

3. The Spanish king was Charles II

4. ACW saw the first use of armoured trains and the last use in action was the improvised ones used during the Second Chechen War by the Russians between 1999 and 2009.

5. The Sexton and Bishop are both forms of AFV.

Thanks again for all the answers.

Wednesday, 18 November 2015

Arena Rex Vargr

I continue to have little painting to show as my output is either slow or can't be shown due this time to being mostly my Santa Clause present for my target. But I can show you the latest finish from my Arena Rex collection. I had hoped to get one finished a month but that looks like it's not going to happen but still from an enjoyment point of view its a real blast.

This is Vargr, rather smaller than Aquila which was the first of the Arena Rex figures I have painted up. Not that Aquila is the largest of the Arena Rex figures I own. I selected this guy as my second model as I really liked the look of him.

Red Republic Games have used quite a few different artists to sculpt their figures but from what I have seen all are top flight sculptors and like all the others this one does not disapoint.

Great detail which makes the painting so much easier, though I have to say that I am extremely happy with the skin tones I have managed to get. Lots of layering and I think if I keep pushing myself I will really grow as a painter. I am more well known for my 6mm work so it's a lot of fun to show off something a little bigger. I think this figure is closer to true 32mm than many of the others, Aquila is 42mm toe to eye. This guy if he was standing straight would have to stretch to get to 30mm.

Unfortunately I was a little careless on cutting him off his sprue, snapping his ankle and pinning was not an option with the ankle being so thin. The fix ended up being a bit of glue and painting a leather band around his ankle to match the one just under his knee on the other leg. 

The action poses are only possible due to these models coming in multipart kits, in this case originally four, that is until I made it five part!

It's now possible for me to play a game with a couple of real models. It won't be much of a game but I am sure The Boy will be only to happy to hand me my ass on a plate.