Saka Light Cavalry

Saka Light Cavalry

Friday, 27 August 2021

54mm Girl With Bunny

 Knowing I can not hope to get the Tiger finished before starting on a couple of Tournament trophies and being the same with the Hussar Bust I wanted to at least finish something so went with this lovely 54mm 3D printed figure. 

Bags of character but I felt she should be not so innocent, maybe it's the bunny but I just felt she would have some dark secret that makes her dangerous.

I wanted pink for the bunny so made it a bit tough on what other colours for the night dress as white was out of the question. Yellow seemed the best solution as it's neither creepy or out of place and besides I have the new paint set that I have only used for small areas. The pale or baby blue works for me so I went with it. It has to be said Cath was not a big fan of the choices but we don't always agree on such things.

I added the blood to the base and some on the figure to try and add a bit of freaky to it. A big part of why I used the backdrop (mix of airbrush paints and cleaner that I thought was a bit dark). The figure comes with the option of a open wardrobe with arms reaching out of it.

The blood is also on the girls hand, dress and the bunny's paw and lip. So the question is which one? or maybe both, but either way little Timmy ain't coming out to play.


So a figure that was just bought to paint with no actual use or design. Just nice to paint something just because. I have another 3D set to paint based on the Pied Piper, that will have to wait for the time being as I start the commission work and insert bits to keep me motivated.  I will have however a few more games to report as I continue to play with Matt and have started to go to a games club in Chesterfield.


Wednesday, 4 August 2021

Tiger 1 Build Update 2

 Since the original post I have managed to build up the Tiger to the point it will receive it's base coat. The Photo Etched has been a huge learning curve that has tested me quite a lot.

The interior of the hatches have all had a big upgrade with multiple parts with up to six bends to a single piece. Front mud guards were less tricky but still full of challengers.

Less bends on the righthand turret hatch but the small catch is actually three parts! The crew will be all over the hatch areas so I felt I should add the detail and now wait to find out how much is hidden by the figures!

View of the rear of the turret, a lot of the PE requires the original details to be filed off the model to be replaced with the brass parts. I have in plenty of cases felt the added detail was not worth the extra work. Here it seemed well worth it, about 40 minutes a clasp I was not so sure.

Each clasp set has four parts, the base plate that requires two bends on a area about half a mm if that, these then allow the hasp to be fitted into the two bent arms. Then the lock has it's upper wire bent to go through hole in the clasp. Finally a upper piece fastens to the tank box and threads through the back of the clasp!


Adding the side skirts last night and today took up a chunk of my modelling time and I had a fair bit of fun bending the skirts after looking at lots of photo's of Tigers. Seems the skirts were easy to damage in Normandy due to the narrow lanes in the Bocage. This will hopefully come across on the diorama. 

Very shinny at the moment, hopefully the primer will deal with that tomorrow. The rear guards were the most challenging and I had to go back to do a few changes to get them right. 


One flaw with the kit is that you can't have the turret facing forwards if you have the hatches open as the lugs force the turret to be put on to the side and when traversed hits one of the forward hatches. Simple solution is cutting off the lugs, will be glued in place when fully painted so no problem for me.

Half the wheels awaiting priming in the base colour. I won't fit the wheels until I have added mud and other effects to the lower parts of the tank. This will allow me to work a lot of effects onto the wheels as well. Tracks will not be even looked at for awhile yet.

Still need to add the exhausts and housing but these will be done post painting the body of the tank as using the airbrush. The AA MG will also be fitted once the tank is painted and tracks added, too delicate to risk getting knocked about.

I have two tournament first prizes to start in the next three to five weeks so not sure how far I can get with this. I should get the tank done for the most part as I am off for a little over a week and we don't have many trips out planned.


Saturday, 17 July 2021

First Game In...........................

 Finally got a game in and it was against Matt, a Macedonian V Seleucid tilt, only 500 points to get back into it and were we rusty!

I had the Macedonian's and wondered why I had so many more troops, his cataphracts cost more but I was starting to worry I had miscalculated. Turned out I had not and some of Matt's choices are point heavy. This was to tell at points in the game.

Both of us really struggled with getting troops to move forwards with my left wing flying ahead before stalling and started to really suffer from skirmishers nipping at my now exposed cavalry.

My far right faced off against the same light cavalry and whilst Matt won the first two rounds he was unable to break me and in the end we both well back shaken and disordered.

Matt would regain his order before me but neither had the opportunity to challenge the other for the remainder of the game as rolls were getting worse not better.

Still on my right and still unable to move a thing! My only saving grace was Matt was not able to move either. Matt would like you to know at this point I had moved most of the way back to my start position, he was not wrong.

Meanwhile half of my phalanx had been moved forward to threaten Matts Cat's, the rest was struggling as much as my cavalry.

The big face off would be on my left as I faced four units of Cats with my three units and a light cavalry unit, see above left as he threatens the mighty Cats.

A close up as he did so well. Not getting many casualties dealt but was the king of disorder on those Cats.

I had some success driving back Matt's annoying lights but the damage was already done.


Meanwhile the only movement seemed to be my lights pushing the Cat's back, I was fortunate that Matt failed a few pre move disorder removal checks or I would have had both flanks crumbling at once.

It's a funny old game, if I could just have attacked I could have taken advantage of this situation but alas.

In the end I against probability drove Matt's right most unit back disordered. I had support in the other but Matt rolled well, I rolled the opposite and oh well scrub one unit of mine.

It was my turn but Matt could make a move and so positioned himself for a flank charge, looks very much a bad situation but the rules whilst not allowing me to counter charge did allow me to wheel and meet him halted and not in my flank. It would have been different if it had been an infantry unit.

Back on my right things continue to not do a lot.

Finally the blocks crash into each other, well as I can't counter I stood and took it on the chin. My supports helped to keep it close as whilst I lost more casualties it still counted a draw.

Round two would have favoured me as long as I got my other two blocks into the scrum. I suspect the melee would end up splitting down the middle with both sides more or less spent and little to offer the rest of the battle.

I had survived the almost flank charge but could not afford to be pushed back which was a real possibility having lost the first round of combat. Given that we stopped at this point it's a mute point but we both agreed that no matter what happened here the game was up for my guys as both flanks had to go Matt's way whilst the centre was going nowhere at best.

No doubt we could have done better, both failing to get round to reading the rules and I especially should not have been pushed around as much as I was. Got to get better at owning the edges but I will say the dice did not like either of us but seemed to dislike me more. Matt though did make the best out of the chances he had.


Saturday, 26 June 2021

Tiger I Build Update 1


My next diorama is this Tamiya 1/32 scale Mid Production Tiger I. I am giving myself a window of three months to build the kit and assemble the rest of the dio. I have added the Voyager Models PE kit that really ramps up the complexity and of course detail. I also ordered a metal barrel on a friends recommendation. So far resisting the metal tracks but if I struggle with the plastic ones from realism then I will probably go metal. Rather not as that will help ramp up the costs above what I probably can sell it for. The figures are mostly plastic with at least one will be resin, all depends on if I can get more figures that fit with the scene I am planning.

Some of the detail is insane, love the hatch parts, these will be late added items I suspect. Already decided a few parts don't add enough to be included and being stretched with some of the bending and gluing I have done already.
Covers for the exhaust, the bolts are being added to the cover plate which is about 6mm across. 
Plastic rod to replace the Tamiya rods fitted into the exhaust. I missed a trick I should have tap drilled them mounting hole a little deeper to make a more solid fix, lesson learnt.

One of the two finished, well sort of. I need to dial back on the corrosion I think, though they are mostly hidden by the exhaust shrouds so may need to be a bit OTT. I am using ENML binders that allow me to keep going back to it so can change as much as I like.

First real challenge was the two clamps that hold the jack in place on the rear of the Tiger. Two of these parts require folding, took me about an hour and a quarter to get this done.

I invested in a small PE folding vice tool. Already very happy that I did, it's going to get plenty of work on this build.
The wing nuts actually made me smile, lets see if that's the case when I have done a few more. 

I plan to do as much as the basic build as I can before adding as much PE as possible though bits like the metal grill covers needed to be added before some of the other clutter. The PE instructions are rather cluttered and sometimes don't make as much sense as I would like but with a lot of looking and cross referencing I seem to be doing OK.
I will add the wheels close to the end of the build as I want to do a lot of the weathering of the under side of the tank before fitting the wheels and tracks so as to be able to get right into the shadows.

Tracks are going to be such fun, build, paint and weather. Will be adding track sag at least I hope I will.

Between sessions on the Tiger I will be working on the figures and a bunch of other projects just to keep things fresh. As to how many will be wargaming related rather than just painting remains to be seen. However I am in the process of sorting my first game in years so that should provide a spark.


Thursday, 24 June 2021

British Paratrooper "Red Devils" Arnhem 1944

Sorry for the lack of blogging recently, I've been painting but just not the stuff that tends to interest my followers. However with games just around the corner maybe just maybe more of a mix of subjects. However I will soon be starting to post about my next diorama this being a 1/32 scale Tiger I that I have mentioned before. 

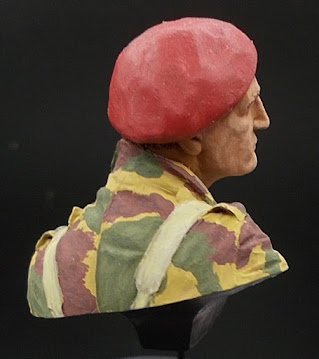
Still not wargame related really is this FeR miniatures 1/16th resin bust. It's just 4cm tall between top of the beret and bottom of the Denison jacket. Total height including the plinth is 7cm so quite a small chap.

The quality of the casting is superb, loads of detail and a joy to work with. The only drawback really is the cost, set against the price of full size busts it seems rather pricy but has the advantage of not taking up too much room.
I mostly used Andrea paint sets which are lovely paints. I feel I am finally getting the hang of the flesh set and feel this time I got what I was trying to achieve, lets see how that pans out over the next few larger projects shall we.


This fellow has landed on my Etsy page which so far has not attracted much in the way of hits though I now have 13 items listed so I hope to increase the traffic. Recently sold a bunch of stuff on ebay and they have decided to hold the funds for a month due to not having sold anything for awhile. Bought plenty though, another excuse to hold onto funds it seems to me.


Sunday, 11 April 2021

The Joker And The Thief Bust SOLD

 At last something that is not even remotely linked to wargames or war. This bust is supplied by The Wonder Emporium UK I went for the 75mm tall one and would have loved to have gone for the larger one. 

Very little clean up work required as this is done before sending out. 3D printing has certainly made leaps forward. Plenty of detail and bags of character.

Even the back of the bust has nice detail. I have added a small plinth as it seems like it needed that bit more to set it off. 

I really like the monkey, the sculptor for me got the balance right and he shows life in himself. The jester for me seems rather sad so the lively monkey is his Yang.
I choose yellow as much because I wanted to use the Andrea yellow set on something much bigger than it had been used to this point with yellow being a tricky colour to work with. I was suitably impressed with it's coverage. Painted over a dark grey primer.
Cath thought I should go blue red but as I said I wanted to try the yellow and I think it worked with the green, this time a Scale75 paint set given to me by Dave D. what a gentleman.


Tuesday, 6 April 2021

6mm Prussian Landwehr by Adler

 With most of my painting time now used for none wargaming projects it was nice to take a step back into an old project and paint up some more Prussians for my 100 Days Prussian Army. I say 100 Days as these did not even show up at Waterloo as I have all those already painted.

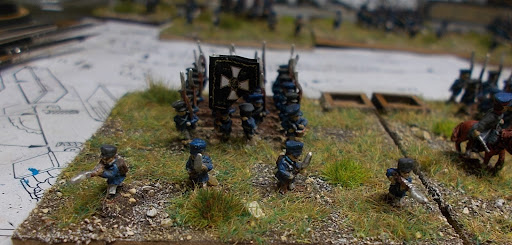
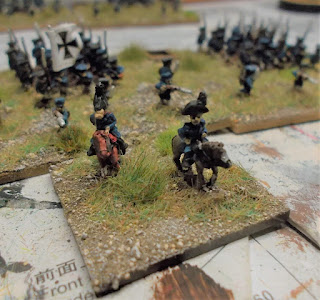
As per most of my Landwehr we have Baccus skirmishers and Adler for the main body. A few of the bases also have mounted generals to add interest.

Three battalions leading the way, 4th Westphalia 1st Corp Second Brigade, only nine battalions of the Corp made a showing at Waterloo, though some cavalry and guns did. Of the infantry I only have nine reserve and three Landwehr battalions to complete the infantry as well as a regiment of cavalry and two guns then one Corp is fully finished. 
The 4th Corp just needs four cavalry regiments painting to be finished but that's because most of that Corp was at Waterloo. I have the figures to do most of the remaining units to have the lot painted up. The fact I will never need all these units for any battle remains a mute point now. Given the amount of money needed to get all the units I don't have I simply don't see the point of not doing them all.

The 3rd Elbe Landwehr regiment from the second Corp, 8th Brigade. This needs six battalions of Reserve Infantry three regiments of cavalry and four guns (2 batteries) to complete. Third Corp is the one needing the most work with 21 battalions of Reserve or Landwehr infantry six regiments of cavalry and six guns including a horse battery. These will probably be the ones finished last, well unless Lee suddenly wants to fight a battle that these were in!!!

I know it's kind of pointless painting up all these battalions when in many of the cases I can just sub a different battalion without much chance of being pulled up for using the wrong battalion based on collar or cuff being wrong but at least I can fantasise about using them all in a sweeping campaign.

I also painted up a couple more command bases. At some point I need to check how many I have so to make sure I can supply enough for any battle. Our rule system requires a fair few. Next up for this army is a couple of cavalry regiments but they are being bumped down the list as other projects need work doing on them.