
After the fairly successful mini game using the Commands & Colors Napoleonic combat system we thought we would go a bit larger. Well about twice as large and with a fairly historical orbat as well. I wanted to try out the rules in relation to the British, after all the first major test will be the Waterloo game. The result was all we could have wanted, a good interesting game played out over about three hours.

My French (on the left) need to punch through the Allied forces on the right. If I succeed then the allies will be forced to fall back and high tail back to Portugal. However I am significantly weaker on quantity but some of the troops I am facing are less than stellar so I plan to punch hard in one place and try for a quick win.

For my plan to have the greatest success I really need Lee to be passive. Bad news then that he brings his cavalry around and starts to try and flank me with his troops on his extreme left flank. The only good news for me in this is that they are the furthest away from me rather vulnerable right flank.

I face a strong looking body of troops on my left flank atop a hill but these are Spanish and offer me the best chance of getting behind the allied line.

Typical to our rules, both of us have no issues in the first few turns of moving the troops we want to early on. The centre was happy to just exchange artillery fire with both sides taking a few casualties. Only once both sides are starting to get to close quarters do we find ourselves wishing for just one more move or desperate to get the first move in. Typically this battle would have a few moments where we would have contemplated selling our own mothers for that next activation roll!

Lee starts to advance yet more troops towards the centre. I really need to get going on my left. Meanwhile my infantry simply sit and await his attacks on my right flank, though the cavalry reposition to act as a deterrent.

In cavalry I have the advantage with a regiment of Dragoons and one of Cuirassiers with another of Hussars facing light cavalry of the British. My cavalry have the advantage of weight and numbers but I play it safe keeping behind my guns.

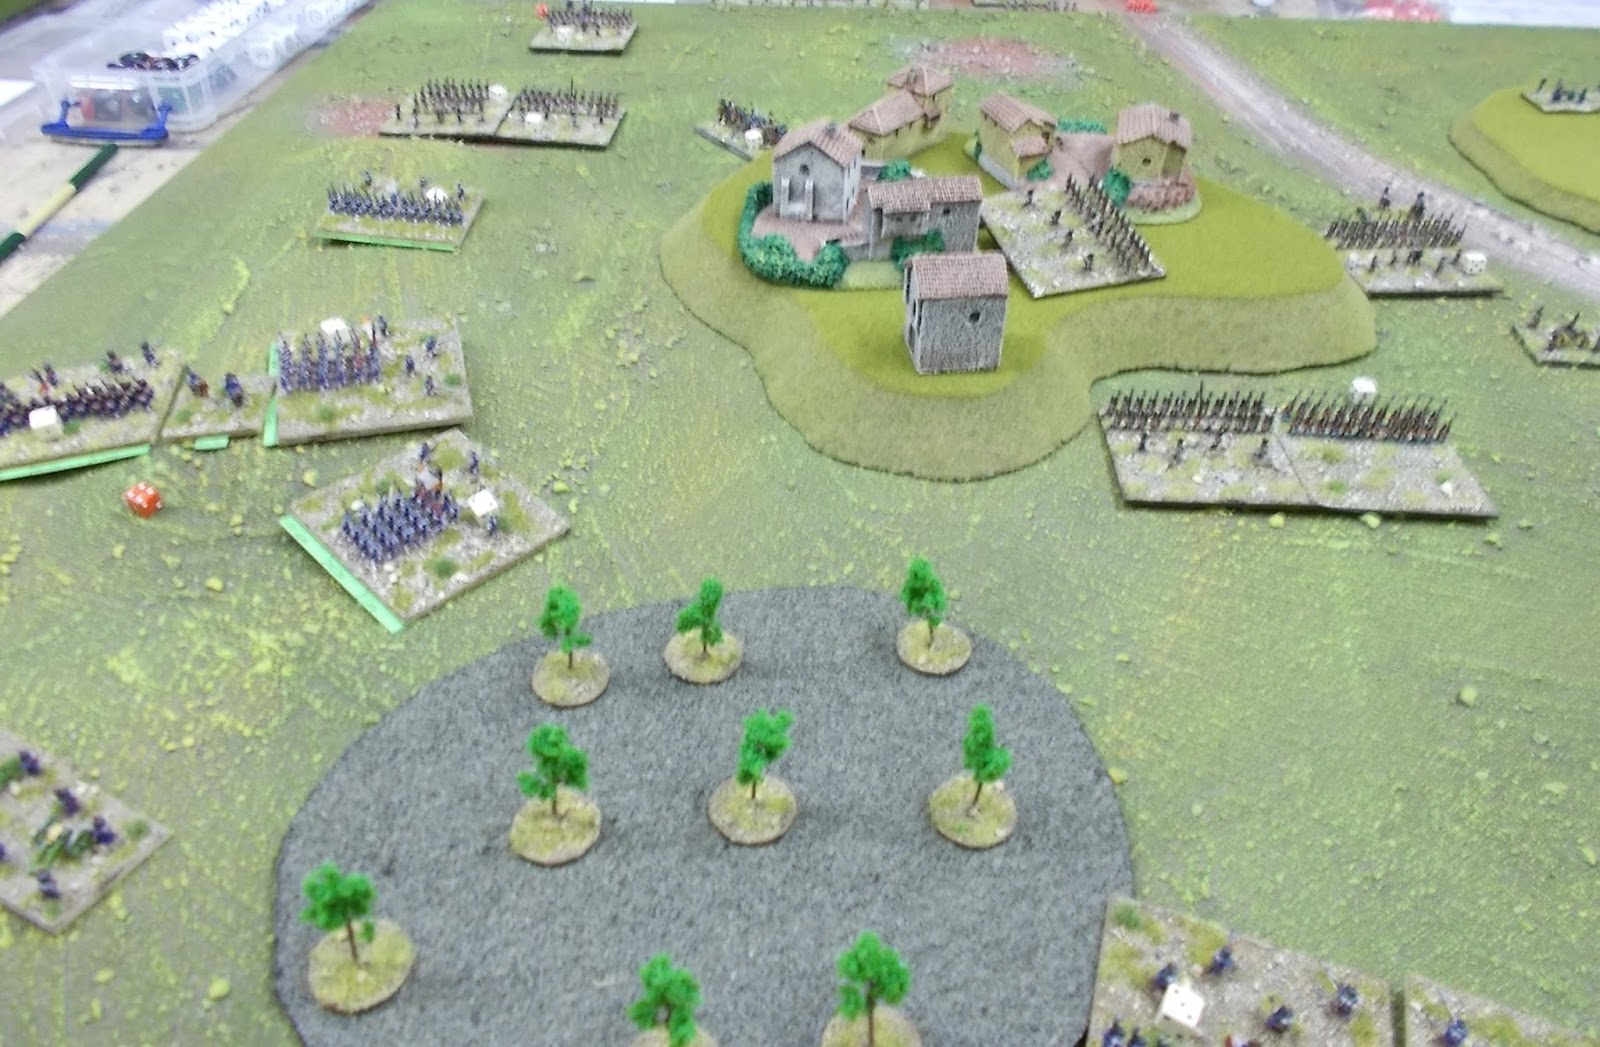
The woods supply me a secure flank, unless Lee plans to take a wide detour. I turn my horse artillery onto his cavalry forcing one regiment to retreat leaving another a little exposed.

The clash on my left saw may French infantry take advantage of their melee bonus as they crashed into the Spanish after a short fire fight and the results were not totally one sided as some of my original units were cut up enough that they would take a fair few turns before they were good to go.However having reserves I was able to bring up yet more troops and break the first line. However I was not the only one with reserves and Lee was able to put a second line in place whilst his very depleted troops tried to rally behind them.

Lee did have a couple more regiments of cavalry that were in the centre and he released these to slow down a second probe I was sending out. The original idea was for them to stop Lee reinforcing the infantry battle that I was winning. It's drawing the cavalry into the fight should have been a big plus for me but they were doing an excellent job of forcing me into square and try as I might I seemed unable to do much damage to him. Fortunately as he had just the two regiments his damage was reasonably limited whilst his guns were busy elsewhere and his infantry remained on the hill or in the village.

Lee's attack on my right flank was starting to stall a little as the focus of the battle was across the other flank, that did not stop the cannons a roaring but the advance was at the pace of the infantry.

My guns took a bit of a pounding but remained in place until masked by my cavalry at which point they started to rally back their strength.

The Spanish cavalry were becoming a real pain as my advance stalled near the village. On the bright side it was not without loss as they started to be worn down. A mix of artillery and muskets was taking a toll. If at this point Lee had moved them behind his infantry for a turn or two of rest they would probably been a real problem later. However his need to keep me in square meant he had to keep them charging over the plains. Meanwhile I was trying to get ready for my second attack on the Spanish flank force.

The centre was dominated by the artillery, I had three batteries able to fire into the centre and this was keeping Lee at bay whilst I tried to fight off the cavalry and then wear down his infantry.

Lee tried charging my infantry on my left, almost breaking a square (it was to rout after more damage from Lee's artillery. However this would be the British high water mark.

One charge was to tip the balance, already down one cavalry regiment the second took heavy losses and was set to be lost either to artillery or a heavy cavalry charge in the flank.

However Lee was advancing his infantry behind the back and forth cavalry scrap. By this point Lee was wishing he had used the division he now masked as he had lost a fair bit of time marching to the sound of guns and not actually fighting. My right flank remained solidly anchored on the woods.

I finally got going again on my left flank. With so much going on from the rest of the field and the need to regain strength I was slow getting this attack going. Of course Lee had been rallying his spent infantry as well. My advantage was that I had more units that survived the original attack though some of these were quite fragile and were slow to come back to strength. However my second attack on the hill was meeting with some success.

Lee was now getting worried about his flank and started to come down off the hill to try and support his now worn out cavalry in an attempt to stall my attack to the left of the village.

Some good artillery work sent one battalion back a couple of moves distance fracturing his attack. I had bought myself a little more time to crack the Spanish nut.

With the British cavalry still in the action and some of the best British infantry marching in support I needed to bring his cavalry to battle and I could not do that on the defensive so this was the last turn my cavalry would be sitting back. Of course that meant coming out to fight and that meant moving the focus away from elsewhere or winning more activations than Lee.

Neither of us had enough command opportunities to do all we needed at this point. For a turn I would get to move all my formations but then loose the initiative as Lee took command. For Lee this meant a powerful brigade got to fire off the odd barrage whilst his Spanish were in the thick of it and I could not reset my troops for a coming attack or pause at the moment I needed to break those Spanish.

I finally saw off the British cavalry and then started to turn my attention on the British infantry. This would be bad news for Lee's planned sweep into my right flank but whilst this was certainly helping stabilise my right it was doing nothing to help bring the battle to a conclusion in my favour.

However the Spanish cavalry were finally worn down, one regiment leaving the battle whilst the other sheltered behind there infantry, this freed all my infantry and I shook two battalions out of square and prepared for the attack on the village that should free my leftmost infantry safe to attack the final defensive line between me and victory. Did Lee has his own plan to stop this?

The British in the centre started an advance across their frontage and were looking to break into what was a fairly weak and stretched part of my line as most of my infantry had drifted further to the left.

However my three regiments of cavalry were causing mayhem on my right. The planned strike into this flank was stalled with the loss of Lee's cavalry and my cavalry were forcing battalion after battalion into square. Lee's only comfort was that it was eroding my strength though not enough to risk a full powered charge.

The red dice show units in square, they can only come out of square when enemy cavalry are out of charge reach or site (by cover or friendly unit).

I won the bloody fight for the Spanish ridge but was further weakened. Lee now had just three battalions of worn Spanish facing my four stronger battalions. He could and would reinforce with troops from the village but that only would make the job of attacking the village that much easier.

I lost one of my cavalry regiments and whilst the British division was also quite bruised. However Lee did have one fresh Brigade in reserve whilst all my brigades had seen some action with two close to being broken. I had fought off Lee's first attack on my hill but as my cavalry weakened my ability to hold him back was coming into question.

I withdrew one regiment of cavalry behind the woods in the hope of rallying troopers back to the colours but it was slow going. Meanwhile I fell back away from the woods back onto my centre. Lee had his fresh troops on the way and would soon be shaking his squares back into line. I was running out of time.
I finally have the hill on the left flank, Lee dropped back his shaken Spanish battalions whilst bringing his worn out last Spanish cavalry regiment to that side of the hill. He was getting no luck with the dice regards rallying back their strength and I would not again form square if they charged. Finally the nut was cracking.

Whilst Lee had his battalions shoulder to shoulder mine were starting to look ragged. Lee was also starting to be able to consider staying in line as my cavalry threatened to charge. The best I could hope for now was time to spread out along the hill line and hold off Lee's fresh troops but even if I did I was now down to a rather ragged force in his flank. One brigade had started to retreat and my best option would be to bring more troops back to the line to stop Lee's advance.
Whilst we could have gone on for a couple more turns both armies were so close to being forced from the field we agreed neither would or could press the attack without risking loosing their army. So Wellington was not forced back to Portugal and another French army fell back on it's supply lines.
As mentioned at the start it was a great game, full of excitement and certainly had that Napoleonic feel. Now I just need to break his damned lines!
A very nice report. Glad to hear that you enjoyed the game! :-)
ReplyDeleteIt was close and fun, can't ask for much more :-)
DeleteIan
Nice AAR. It certainly looks like an interesting, tense game.
ReplyDeleteThanks, next one is designed by Lee, looks to be another good one
DeleteIan
The 6mm stuff looks great - like a miniature painting of the period.
ReplyDeleteIt's what draws me most to the scale for Napoleonic's, Lee's boards really help with the feel too
DeleteIan
Great report Ian!
ReplyDeleteCheers Rodger
DeleteIan
The scale of these games never fails to impress.
ReplyDeleteThese are tiny compared with Project Waterloo but we have some more really BIG ones in the pipeline
DeleteIan
Nice game
ReplyDeleteThanks Adam
DeleteIan
A great report Ian, I enjoyed that thanks!
ReplyDeleteCheers Ray, it was good for us too. Staying in Spain for the next game as well
DeleteIan