Saka Light Cavalry

Saka Light Cavalry

Wednesday, 5 March 2014

Twelve Hours Till Heroes

Well in just twelve hours I will be packing the last items into the car ready to get off to Blackpool for Heroes, a Advanced Squad Leader Tournament that pulls around sixty players of the old Avalon Hill boardgame. Not everyone though joins in the tournament, they either play monster scenarios that will take four days to play or lots of smaller friendly games. Not that the tournament tends to be played in a less than friendly manor most ASL'ers are an amiable group with laughter coming from all sides.

I will look like this on Sunday!!

I am one of those none tournament types and plan on playing smaller catch games all weekend and given that my nephew is also doing the same as well as Martin or swearbox as he is known in our house I won't be short of opponents.

So as I packed the car earlier I considered the amount of kit I was loading and thought it might be worth listing here.

Over 100 boards, the playing area is made up of these 8x22" boards can be as little as half a board or upto and beyond five of them

Eight paper historical map sheets that cover such places as Stalingrad to Normandy, I have a lot more but only taking what I need.

Thirteen boxes of counters, or shall we say THOUSANDS of counters, all punched and none clipped.

About Fifty scenarios selected from over three thousand which made picking the scenarios fun in itself

Sixteen precision dice, these are Backgammon Professional dice costing about £5+ each but are almost perfectly square and balanced, ASL'ers are precious about such things.

Three sheets of plexi glass to put over the boards so the maps are fully flat (each sheet for different numbers of boards)

Devils Sperm to hold boards, plexi and overlays in place. Actually it's Museum Gel, specially made for holding exhibits in place and not leaving marks but my name is cooler

Custom made dice tower to add to the random effect of expensive dice

Every official overlay to change the board layouts (that's a lot)

Four Binders of Rules and lots of charts, boy does the game need rules!

Cotton thread for LOS checks (two spools as you never know)

Tweezers for getting counters out (Guns and Vehicles) again two pair

Pack of cards for off board artillery chits, yep that would be two packs (miniature)

Sniper Reminders as they are fun (and I hope to sell some as well as supply some for the winners)

Then I have to drive over to pick up James and he has to add the same again (well most items)

So are we crazy or what?

Monday, 3 March 2014

Baccus 6mm Generals The New Castings

I have had these for some time now, so I must apologise to Peter for taking so long to get them painted. As anyone who follows this blog will know I have been painting up a lot of 28mm WWII of late, a trend that will run on for a little while though I plan lots of other diversions along the way.

Also worth pointing out the Elite Light Cavalry and Lancers have just been released, I will of course be buying these in the next few weeks or month as I am waiting till the new Infantry in 1812 uniform and infantry in greatcoats become available.


Back to the subject in hand, these are the new Baccus Generals and Marshals from their new pack NFR11 which costs £3 for a pack of 15 figures. These are certainly a major upgrade on the original figures. Whilst this pack does NOT include Napoleon himself (the original had 3 or 4 I think) it does have a much wider range of figures with little repeats. The originals frustrated me with the lack of choice so now I am much happier with the choice.


All the figures are mounted and most stationary, though I have made one horse stand on just it's back legs. I would have liked more in motion but I do accept that generals over all just stand about watching ;-)


The figures are quite detailed with a number clearly holding telescopes though the two I like the most is the one wearing a cloak nice and wrapped up and the one holding his hat at his side. 


Typical of a Baccus figure they are sturdy and will take a hard pounding, paint up quickly and have all the detail you need. However they don't have all the detail I want. Adler take full advantage of that extra 1mm (or 2!) and their command make use of this huge advantage. True they are far more delicate and take much more time to clean up and paint so at the end of the day it's very much a personal choice which to go for.

Taking all this into account I still give these figures a huge thumbs up and if you already have a complete Baccus French army it may well still be worth buying the new command to replace your old and what ever French Army you own it's worth adding these new commanders to it.

Sunday, 2 March 2014

Quick Basing Tutorial.

Below is a post I originally wrote 16th June 2013 so it's not exactly old as such, being under a year old but I think it's a post well worth pulling out and showing off again. Whilst it's been used for 6mm it works well up to 28mm with little or no change beyond larger tufts. Hope you enjoy

I have been asked to give a guide to my er Lee's basing system. This is a really easy and quick way of basing your figures but I think they come out looking really cool. I have used it for 6mm and 15mm but it can be used for 28mm which is how Lee normally works though this version has been dumbed down a little.

Paint your figures by your chosen method but paint the figures base a darkish brown. Then give them a good varnish as the basing stage can be a bit rough on the figures if you don't. You have two choices when you glue the figures down, either base them really close together or leave a large enough gap to get the brush between the rows. Either way it's best to paint the area the figures will be brown so any hard to get to spaces don't show up.

Bitter Chocolate. 
Sandtex Bitter Chocolate Smooth Masonry Paint is the best choice for using as the base coat as it is rather thick. This allows it to pool as you see from above and whilst it's not slow drying it stays wet long enough to move onto the sanding stage without the need to hurry the application stage. 

Awaiting the sand.
I use sharp sand that you can get from any DIY type store and whilst it is cheap it does have a few issues that need resolving. First some of the pebbles are huge no matter what scale you are working with and these need sifting out. The smaller the scale the more sifting you need to do. You do not want kids play sand or aquarium sand as these are too fine and you do want some pebbles and stone chips to get the uneven finish. Secondly it usually is damp. You need to dry it out before use. A nice sunny day helps if you can leave it outside spread out on trays. Also if you can get away with it, putting it in the oven at a low temperature in batches also works.

Deep in the sand.

I find the best way is to just place the base on top of the sharp sand and then pick up the sand mix and drop it down onto the base rather then use the base as a scoop. Once you have the base covered (nice and deep) then turn it upside down tapping the base to get rid of the loose sand and pebbles. Then check the base for any areas missing enough sand or any pebbles that are two big or too clumped together. Remove the excess stones or add a bit more sand as needed and set aside.


Now you see why they need to be varnished first.
On taking out of your sand box the colour will be really light, this should go darker as the paint soaks through the sand. If this does not happen you have either too much sand or not enough paint on the base (you need the paint to be fairly thick). It's a matter of trial and error and your taste will have the final say. If it is to bright you can always paint a dark brown over at this stage but to me that's an extra stage that can be avoided.

Fresh from a dunking.
The sand and Sandtex stage can dry within an hour or so so it's possible to get a long line of bases to this stage and then go back to the start and onto the next stage.

Drying out and ready for the next stage.
When you can see the brown showing through and looking dry it's time to move on. If it's still a little damp you can still move onto the next stage.

Dry brush the darker colour over the base.
You only want to do the dry brushing lightly, get most of the paint off the brush and then as light as you can start to brush over the sand, make sure you do this from all angles so you get a none patterned effect. Make sure the rocks get a heavier coating as they will be standing out. I use Miniature Paints 62 Sand, yes it is kind of ironic.

Light Colour added more sparingly.
Next it's the top coat, Lee uses MP Light Cream whilst I bought MP 71 Pale Flesh which works well. Why MP paints? well they are thicker than Vallejo which suits this task. I tend to tey to be a bit lighter with this stage, except the stones and rocks which get a more solid cover leaving the background colour of sand. This I think looks more natural than leaving the pebbles and chips natural.

Comparing sand against sand and pale flesh stages.
If you are painting troops for the desert then you may wish to change the colours in the various stages. Above left just has the first stage finished.

Flocked and ready for that last coat of varnish.
For flocking, again it comes down to personal preference. Lee advised two parts Autumn Grass and one  part Summer as this gives a good mixed look. When I got my three bags I though he was mad, the Summer grass just glowed! but once mixed in with the much darker grass it looked much better. When it comes to replenishing your stock don't worry about using another supplier, this just adds to the tone and it's well worth getting the replacement when you still have plenty left so as to help create a richer mix.

Just out of the static tub.
How much static grass you add is really a matter of choice though I find less is more. I use good old PVA but be aware that the glue spreads a little (more than you might think) so you add glue to a smaller area than you want it to cover. If you then want to add more you can which is a lot easier than taking the excess off. I break up the clumps of static as it tends to gather when left alone, I then drop the loosened clumps on to the base till it covers the whole base then turn it upside down and tap the base straight after. This gets the excess off and helps make the rest stand up.

Ready to take it to the French!
Before that last coat of varnish I use a large brush to remove all the dust and spare static on the figures. Then it's a coat of varnish for extra protection of the figures and to fix the grass in place. Last up it's flagging the battalions and then it's all done.

Saturday, 1 March 2014

Leven Miniatures Willey Gallery

Mike over at Leven Miniatures has honoured me with my own gallery. I am rather happy with that turn of events. Given that I have not had the chance to do a building of the week for this week as I need to push through some figures I need to have ready for Thursday I am taking advantage and replacing it with this post instead.

Talking Leven, Mike has released more buildings (that's a surprise) but these are wrecks!! So if you want a ruined house or two in 6mm here they are.


Mike has sent me this house to paint so I will make it one of the next buildings I do, looks perfect for the WWII Europe gamer. I hope to get some painted up before I disappear on Thursday to Blackpool for four days of ASL but no promises.

Friday, 28 February 2014

Viking Test Figure

Wanting to do something totally different I decided to beak open a box of Griping Beast plastic Viking Hirdmen. Not that I had any business doing so with so many other figures needing attention but lets face it, reason is one of the smallest ingredients in this type of cake.

With the plastic's you have a lot of choices for weapons, heads and even purses! This one I went with the dagger attached, though I am fairly sure it could be missed off and not make much difference to the finished model. Indeed if not for the fact that these will probably end up being used for SAGA then I would miss them off.

Clean up and assembly was fairly straight forward, much better than I had feared but I am guessing if I was doing the other 43 as one batch it would be a much different story. Maybe I will do them in batches of five or so?

Being a test figure I have gone fairly basic with the colours and pattern. I think one from each batch may get a far more detailed patterns though I do like the fairly plain look for most of them.

I meant for his hair to be more blond but in the flesh it's not so brown. I love the scabbard as it's suitably long with the hilt of the sword also proportionally long, this figure could never had been cast as one and that's a big bonus that plastics have.

 The base is a good old 2p coin which gives the figure some nice weight and makes up for it being so light. I will be basing all the WWII Winter War figures the same way. Funny thing it's cheaper to base on 2p's than it is to buy the same size bases from Warbases so I am saving money by using the coins.

You won't see more of these though till I have painted up Mats 6mm Zulu's that I would have thought I would have finished by now, oh well they will be on the desk soon competing with my 6mm Naps for time. Did I mention the Winter War stuff? I guess my tables going to be rather full of figures jostling for pole.

Wednesday, 26 February 2014

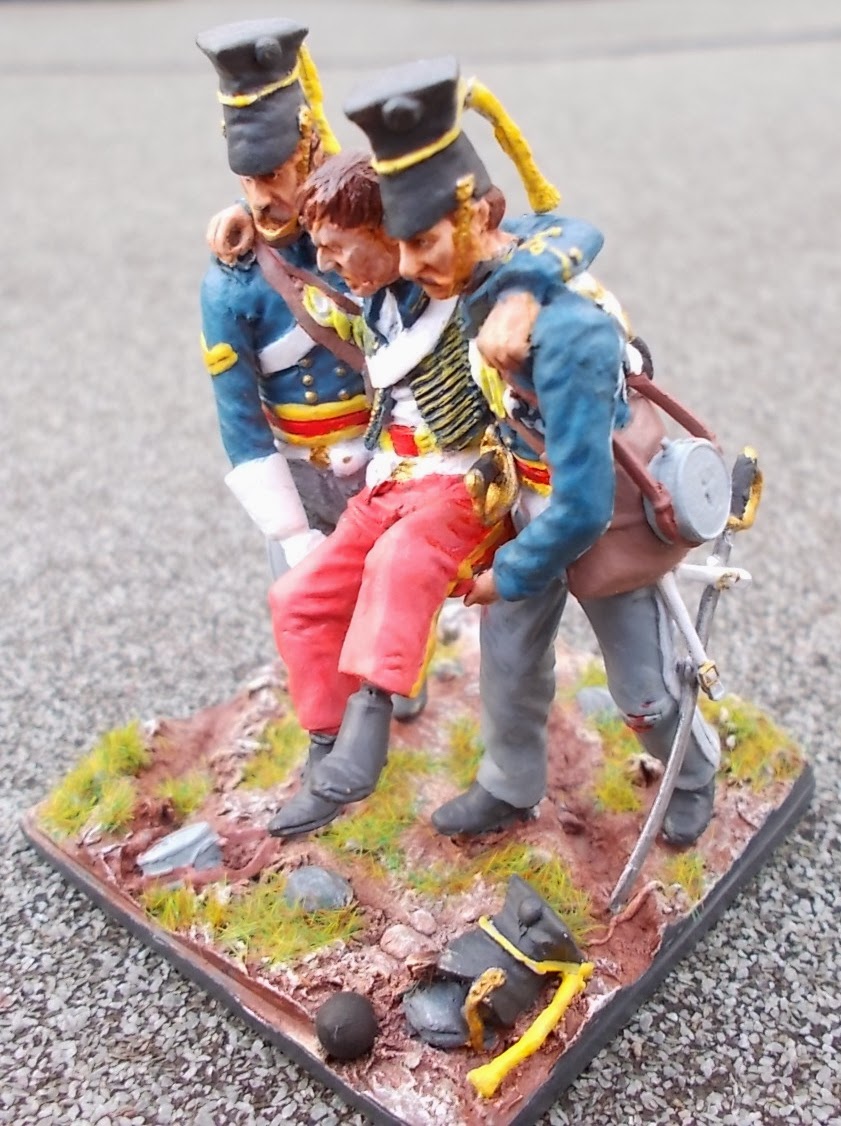
54mm Aftermath of the Charge of the Light Brigade

I bought this set of three figures around two years ago off of E-Bay knowing it was just for the fun of painting them. Fast forward too the a few weeks ago and little had been done to get them done, too many other must do projects.

As soon as the bonus round was declared I knew I finally had a great reason to do them. So I pulled together as many pictures of this model and paintings etc so as to have a good stock of ideas to draw from.

This is an old set and as such the detail is a little flat in places but still enough to work with. I did get this part painted when I knocked it and a box of finished models with my elbow. I still have a fair amount of touching up to do to get the finished stuff fully repaired (some I will chuck) and had to reassemble this one and take it back to base coat and start again. That took some of the shine off it for me but at least I had not added the swords as that would have probably caused me to just bin it, oh well it happens to us all....

I wanted the casualty to look like he was suffering so painted the eye area fairly dark but the rest of the face was a few shades paler than the two Lancers carrying him. Overall I was happy with the result. 

The belts that hold the swords in place are all the same size on the trees and needed to be cut to length which was fun given I had no instructions. Same actually for the canteens as these have to be glued in place and straps cut so that they fit to match the sculptured ones.

The braids on the hats also needed to be added, including the one on the floor. Missing was the spurs which I was trying to add with fuse fire but had to accept defeat as they just did not want to stay attached looking anything but spur like.

Close up of the faces, these guys won't win any beauty contests will they? Some of the detail was so thin that I really struggled in working out what each bit should be so it's no perfect finish for sure.

I had big hopes that this would show well in the bonus round but with so many great entries I have been placed rather low, though I will admit I am surprised I have had so few votes (mumble grumble) though I am very happy to report that the six I voted for are all in the lead so I have excellent taste  ;-)

Saturday, 22 February 2014

Building of the Week Medieval Post Mill

I have been working on this for a few weeks now off and on, more off than on for sure. I have gone a little over the top on this one as I wanted to build into the base a bit more of a hill which is now in place but it's not that high, oh well.

Another Leven Miniatures model again, this time from the Medieval Range MED01 that surprise surprise has a cost of £2.50 and comes in three logical pieces. The body of the mill, the sails and lastly the steps which I had managed to wash down the sink when cleaning the mould release off the bits, but Mike sent a replacement without charge.

I based the mill on a few of the Warbases squares starting with a 30x30mm and running to 120mm x 120mm with the corners rounded off.

The mill as per normal painted up with ease though the roof of the round stone lower level was a bit more difficult but nothing that could not be dealt with. Overall the base works though it's going to take up a lot more room in storage than I should spare but I think it's worth it.

Whilst it's a Medieval windmill it's still of use for plenty of other periods as some still exist today and I can see this on a ECW table as well as a Napoleonic.I now have two windmills that can either be used in the same game or just pulled at random though I think I still need one for Spain.

Here is a shot of the whole set against a 60x60mm stand of Baccus 6mm French Old Guard, as you can see it's a space hungry beast. Not sure if this model will make it onto the table for Waterloo but it will get some play in the coming months.