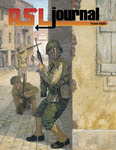
I have been in the development stage of a deluxe Sniper Reminder for months now. That by the way is a posh way of saying I have been scratching my arse er head wondering how to get this right. You see I am doing it for a mate who is rather annoyingly polite. If it turns out gash h will be very pleasant and say all the right things. Worst thing about it is that I can't even hit him as he lives in the States ;-)
So I have to get the feel of the picture above across on a base. Well first up, no way could I do it on the standard sniper base (Warbases Casualty Marker) so asked them to make me some custom bases which they did. Nice large bases in fact and a very fair price I thought. Well as these projects have a way of getting out of control I set firm aims and guidelines. Then of course ignored them. The first issue was always he guy with the carbine. I just could not find that may that even carry the thing, never mind anywhere near the right pose. My mate picks a guy in the right pose but he is carrying a BAR, something at the opposite pole to the carbine, I mean it's in capitals when all is said and done!
The reason for the exact picture is that first the guy is an ASL nut, but secondly his Grandfather was in the same division as depicted on the cover of this Journal and was at the place shown on the cover. Without to much of a stretch he could well have been right at that spot. So my aim is to capture that exact location. Here are the first two parts to the puzzle.
At this point I have the pavement painted, the road added and the wall placed where it will end up. Since then I have painted the road to the correct colours. I till have all the work to do on the wall including the interior. I have the wallpaper picked (after searching many 1930's wallpaper sites - yes they do exist!). I have a little surprise for the interior that I will share when finished. You can see the joint of the two Linka pieces though this is where the figure will stand so it will be part covered by that. I still need to make up the external fascia but have this well in hand. As for the BAR.........
I knew I could not hide the base so tried cutting it off. This was proving to be an issue so I ended up powering up the soldering gun and removing the base. Now I just need to drill through the pavement, cut the pin to the right size and glue in place. Drilling the foot was fun I can tell you (that is if you consider an over sized Scotsman hanging from your clangers over the edge of a cliff).
The only problem is that these buggers come in pairs, a bit like your clangers, so I also have a German one to do. I have the figure painted and I know exactly how I want to do the base. No I just have to convince myself that I have the skills to carry it through. But that's next week ;-)


intersting little project Ian, looking forward to seeing the end result
ReplyDeleteShould look good when finished, keep plugging away Ian!
ReplyDeleteLooks really good so far!
ReplyDeleteGreetings
Peter
http://peterscave.blogspot.be/
@ Andrew, Thanks
ReplyDelete@ Dave, well if it's half as good as you could do I will be happy
@ Ray, Yes I hope so, not done any more but it's back at it early next week latest
@ Peter, Thanks, plenty more to do but I have firm ideas how to go forward.
Ian